Skip to content
  • There are no suggestions because the search field is empty.

Creating Holiday Plans

Before starting to read this brief article, the assumption is that you have already read this one too: Holidays. If not, click on that link and go over its details. 

Let's continue with this now. After you've completed step 1: Holiday Settings, the next step is to create holiday plans where employees can be assigned.
 

Step 2: Creating Holiday Plans

Before you create one, you'll see a default holiday plan on the upper portion of the page.

Default_Holiday_Plan.png

All employees are already assigned, and you can keep it as is, or edit as you find necessary by clicking on the plan then clicking the pencil icon on the Plan Assignment section below.

 
Now let's create a new holiday plan. On the main Holidays maintenance page, click the icon to create a new holiday plan.


Holiday Plan Name

You can rename the holiday by clicking on the pencil icon. Type in the name of your holiday plan and click the check icon.


Standard Holidays

You'll see all the Standard Holidays that have been added via Settings. Check any or all that apply.


Holidays Per Location

Location-based holidays that have been added to Settings will appear in this section. Check the applicable location. Let's select SM Aura for this example.
 

Custom Holidays

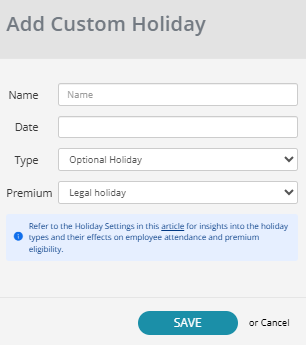
You have the option to add a custom holiday by selecting the specific holiday plan, then clicking the + icon under Custom Holidays. Fill out the details of the holiday being added, click Save, do not forget to tick it within the plan, then save the holiday plan itself. 


Plan Assignment

Lastly, select the employees who should be assigned to the plan then click on the Save button.

Holidays_-_Plan_Assignment.png
 

The new holiday plan will now appear on the main Holidays page. 

Want real-time responses? Explore Sprout Info, your 24/7 guide for product inquiries!