
Hubstaff now integrates with Zapier to improve productivity by automating the way you work. Zapier is an integration hub that allows different products to talk to each other and automate actions across both platforms.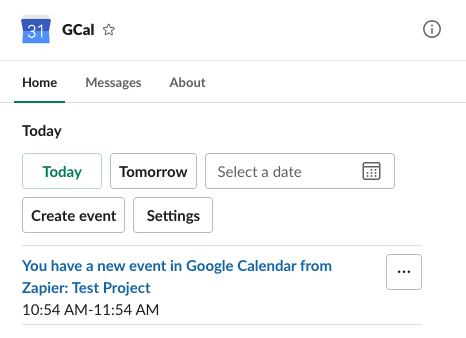
A sample calendar entry created by a Zapier Zap in Google Calendar when a new project is created in Hubstaff.
There are two ways you can use our Zapier integration: Export triggers are actions from Hubstaff that trigger an event in another app. Import triggers are actions from another app that triggers an event in Hubstaff.
Todoist
Create a to-do in Todoist when one is created in Hubstaff
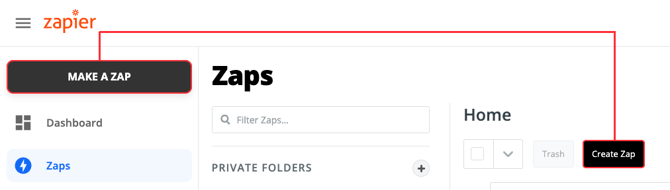
Step 1
On your Zapier homepage, click on Make a Zap/Create Zap.

Step 2
On the Choose App & Event field, type in Hubstaff then choose Hubstaff from the available options below.

Step 3
On the Choose Trigger Event field, select New To-Do.

Step 4
Choose your Hubstaff account.

Step 5
Choose your Hubstaff organization then test your trigger and hit Continue.

Step 6
Under Choose App, select Todoist. Then under Choose Action Event, select Create Task. Hit Continue.

Step 7
If you aren’t already logged in to Todoist, you’ll be asked to sign in to your account.

Once you’re signed in, choose the Todoist account you wish to use then click Continue.

Step 8
On the Customize Task section, choose how your Todoist task action will be triggered.
Required fields:
- Project – the Todoist project where the task will be created.
- Task Title – format the task title.
Optional Fields:
- Note – adds a note on the task.
- Assigned to – adds an assignee to the task.
- Due Date (Human formatted) – supports human-readable dates like “today” etc.
- Due Date (Raw formatted) – supports machine-readable dates.
- Priority – assigns the task priority.
- Labels – assign a label to the task.

Choose either Test & Continue to test your Zap or Skip Test. Turn on the Zap to finish.
Step 9
Choose either Test & Continue to test your Zap or Skip Test. Turn on the Zap to finish.

Step 10
A new task will be added to Todoist when a new to-do is added to Hubstaff.

To-dos assigned/unassigned
Hubstaff’s Zapier integration allows you to create outbound triggers for when a to-do is assigned or unassigned in Hubstaff. To get started, follow the steps below:
Step 1
On your Zapier homepage, click on Make a Zap/Create Zap.

Step 2
Under the Trigger section, choose Hubstaff from the App Event field.

Step 3
Select either To-Do User Assigned or To-do User Unassigned then click Continue.

Step 4
Choose your Hubstaff account from the drop-down list then hit Continue. If you’re not already logged into your Hubstaff account, you’ll be taken to a pop-up window to authenticate.

Step 5
Select your Hubstaff organization, then hit Continue.

Step 6
Click on Test trigger, then click Continue.

Your trigger setup is now complete. You can now create an Action trigger on available platforms.
Import triggers
Zapier is constantly adding apps that can connect with Hubstaff so there may be other apps that are compatible with Hubstaff triggers in addition to the ones listed on this section.
Add to-dos to Hubstaff from new rows in Google Sheets
Step 1
On your Zapier homepage, click on Make a Zap/Create Zap.
Step 2
On the Choose App & Event field, type in Google Sheets then choose Google Sheets from the available options. Hit Continue once you’re done.

On the Choose Trigger Event section, you can choose any of the following options:
- New Spreadsheet Row – adds a task in Hubstaff when a new row is added to an existing Google Sheet spreadsheet.
- New or Updated Spreadsheet Row – adds a task in Hubstaff when a new row is added or updated in an existing Google Sheet spreadsheet.
- New Spreadsheet – adds a task in Hubstaff when a new spreadsheet is to Google Sheets
- New Worksheet – adds a task in Hubstaff when a new worksheet is added to an existing Google Sheets spreadsheet.
- New Spreadsheet Row (Team Drive) – adds a task in Hubstaff when a new row is added to an existing Google Sheet spreadsheet on your team drive in Google.
New or Updated Spreadsheet Row (Team Drive) – adds a task in Hubstaff when a new row is added or updated in an existing Google Sheet spreadsheet on your team drive in Google.
Step 3
You’ll be asked to sign in to your Google Sheets account if you aren’t already logged in.

Step 4
Allow Zapier to access your Google Sheets account.

Step 5
Choose your Google Sheets account, then hit Continue.

Step 6
Depending on your settings in the Trigger Event section, you might see different settings here. Select the Spreadsheet then the Worksheet name, then hit Continue.

Step 7
Test your trigger.

Step 8
Choose the Hubstaff app, then under Choose Action Event, select Create To-Do. Hit Continue.

Step 9
Choose your Hubstaff account.

Step 10
Add a Summary (task title), select your Hubstaff organization, a Hubstaff project, and an assignee then hit Continue.

Step 11
Click Test & Continue to test your integration or Skip Test to skip testing your Zap.

Step 12
Once the trigger conditions are met, a new to-do will be added to the specific project in Hubstaff.

Add new QuickBooks Online customers to Hubstaff as clients
The Clients feature is available on Premium plans and up.
Step 1
On your Zapier homepage, click on Make a Zap/Create Zap.

Step 2
On the Choose App field, add Quickbooks Online, then on the Trigger Event field, select New Customer. Hit Continue.

Step 3
Sign in to your Quickbooks Online account.

Allow Zapier to access your Quickbooks Online account.

Step 4
Hit Continue once you’ve successfully logged in (New users will be asked to create a Quickbooks Online company).

Step 5
Test your trigger, then hit Continue.

Step 6
On the Choose App dropdown, select Hubstaff, then on the Action Event dropdown, select Create Client.

Step 7
Choose your Hubstaff account.

Step 8
Customize your client. Fill in the required fields and/or the optional fields then hit Continue.

Step 9
Click Test and Continue or Skip Test.

Step 10
Turn on the Zap.

Step 11
A new client will be added to Hubstaff when a new customer is added to Quickbooks Online.

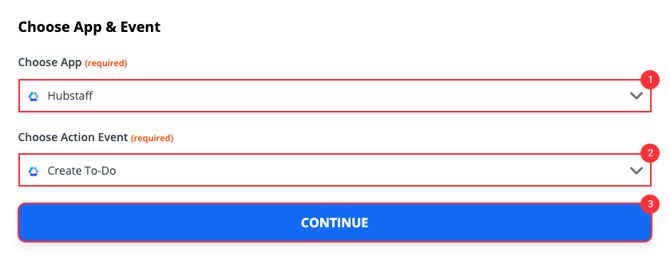
Add new GitHub issues to Hubstaff as new to-dos
Step 1
On your Zapier homepage, click on Make a Zap/Create Zap.

Step 2
On the Choose App field, choose GitHub. On the Trigger Event field, choose New Issue, then hit Continue.

Step 3
Sign in to your GitHub account.

Authorize Zapier access to your GitHub account.

Step 4
Choose your GitHub account then click Continue.

Step 5
On the Customize Issue section, fill in the following:
- Issue Type
- Organization
- Repo
- Label

Hit Continue.
Step 6
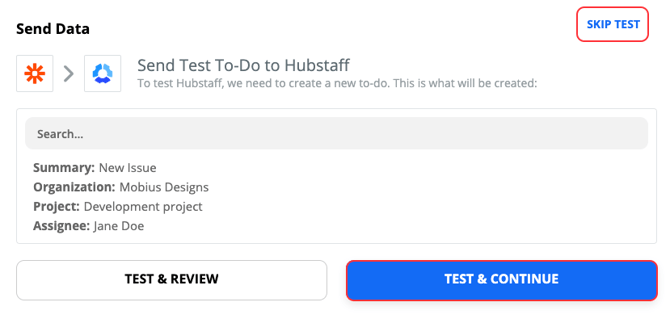
Test your trigger then hit Continue.

Step 7
Choose the Hubstaff app, then select Create To-Do. Hit Continue.
Step 8
Choose your Hubstaff account.

Step 9
Customize your To-do then hit Continue.

Step 10
Click Test & Continue to test your new Zap, or click Skip Test.
Step 11
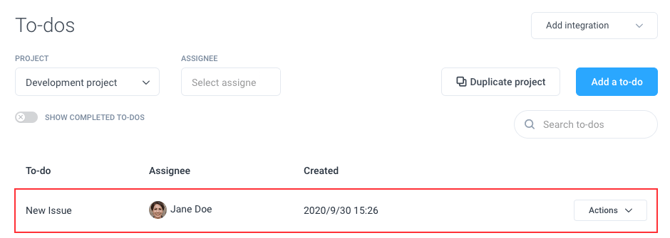
A new Hubstaff to-do will be added each time you add a new issue in GitHub.
Add new GitLab issues to Hubstaff as new to-dos
Step 1
On your Zapier homepage, click on Make a Zap/Create Zap.
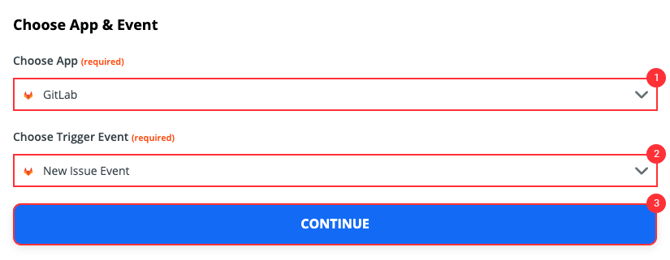
Step 2
On the Choose App & Event field, choose GitLab then on the Trigger Event field, choose New Issue Event then hit Continue.
Step 3
Before you continue, please make sure a Zapier application is set up in your GitLab account:
https://zapier.com/help/doc/how-get-started-gitlab-zapier
Sign in to your GitLab account from the Zap page.

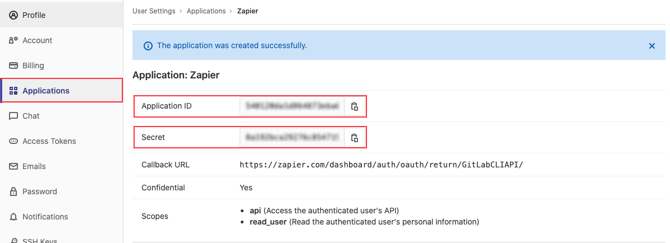
After signing in, you’ll be asked to provide your GitLab hostname, application ID, and secret.

If you are not hosting your own GitLab instance, you can skip the GitLab Hostname.
Get your Application ID, and App Secret from your GitLab Settings page (Settings > Applications > Zapier).
Step 4
Authorize Zapier to access your GitLab account.

Step 5
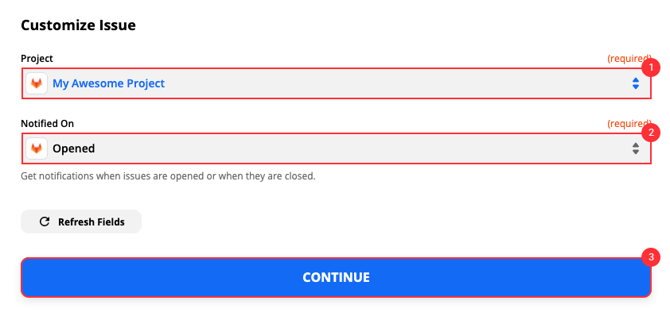
Customize your GitLab issue then hit Continue.
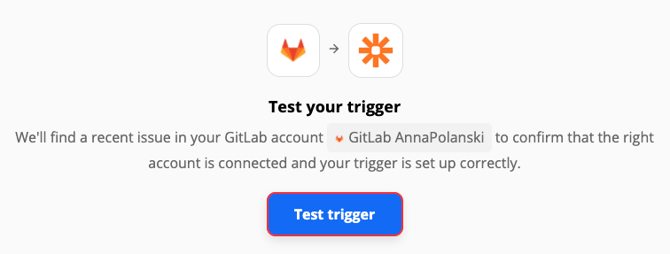
Step 6
Test your trigger then hit Continue.
Step 7
On the App field, select Hubstaff, then on the Action Event, select Create To-Do. Hit Continue.

Step 8
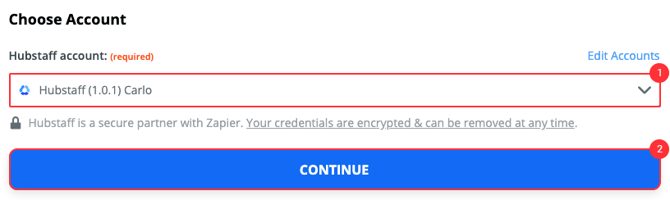
Choose your Hubstaff account.
Step 9
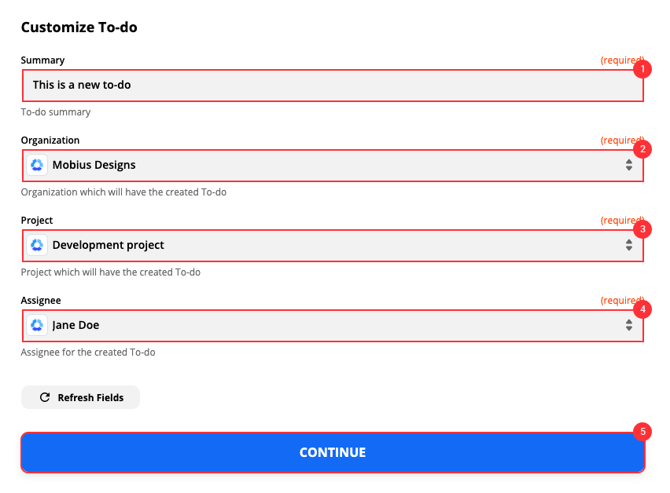
Customize your To-do then hit Continue.
Step 10
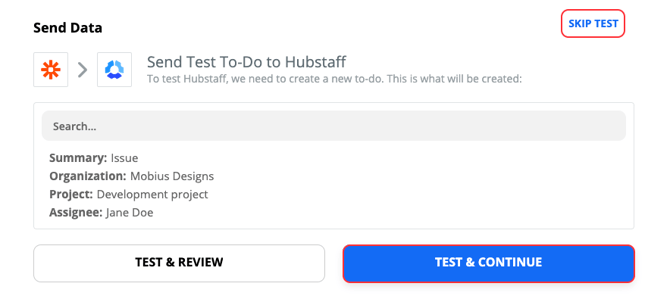
Click Test and Continue or Skip Test.
Step 11
Turn on your new Zap.
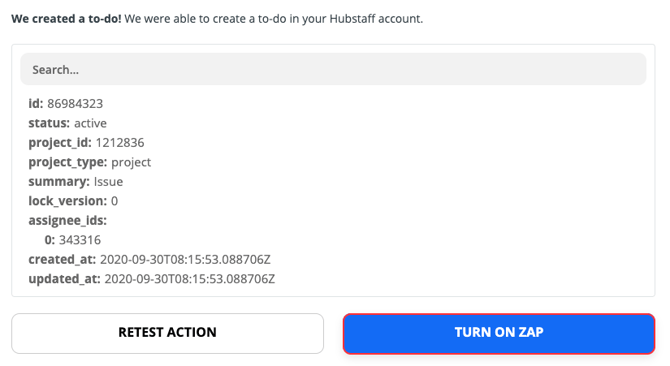
Step 12
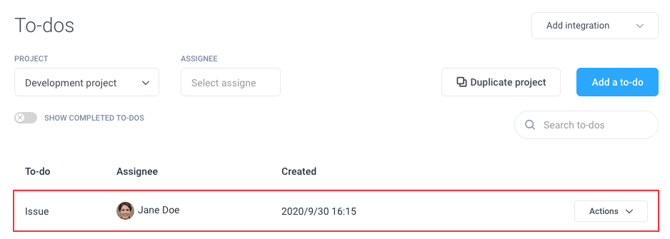
A new to-do will be created in Hubstaff each time you add a new issue in the specified GitLab project.
Want real-time responses? Explore Sidekick, your 24/7 guide for product inquiries!