
Overview & Purpose
This guide provides step-by-step technical instructions for setting up Single Sign-On (SSO) between Sprout HR (utilizing Keycloak identity management) and Microsoft Entra ID (formerly Azure Active Directory) via the SAML 2.0 protocol.
Enabling SSO streamlines user management, enforces centralized corporate security, and allows employees to log into Sprout HR seamlessly using their existing Microsoft credentials.
💡 Integration Highlights:
- Centralized Security: Manage access rights directly through Microsoft Entra ID.
- Seamless Access: One-click corporate login for end-users.
- Automated Account Linking: Automatic profile linking using primary corporate email addresses.
What is Microsoft Entra ID?
Microsoft Entra ID (formerly known as Azure Active Directory or Azure AD) is Microsoft's cloud-based identity and access management (IAM) service. It acts as a centralized directory and security authority that manages user identities, passwords, authentication policies, and access rights across cloud applications and enterprise services.
Before You Begin
Ensure all required administrative roles and environment details are prepared before starting the setup.
People Required
|
Role |
System Access & Prerequisites |
|
Sprout Admin |
Access to the Keycloak admin console for your dedicated Sprout tenant realm. |
|
Entra Admin |
Global Administrator or Application Administrator role in Microsoft Entra ID (Azure Portal). |
|
End User (Tester) |
Active accounts in both Sprout HR and Entra ID using identical email addresses. |
Setup Timeline & Environments
- Estimated Setup Time: 1–2 business days (assuming coordinated availability between administrators).
|
Environment |
Base URL |
|
Production |
[https://sso.sprout.ph](https://sso.sprout.ph) |
|
Sandbox (Testing) |
[https://sso-sandbox.sprout.ph](https://sso-sandbox.sprout.ph) |
Integration Overview & Responsibility Matrix
This guide walks through connecting Sprout HR (which uses Keycloak for authentication) with Microsoft Entra ID so that employees can log in to Sprout using their existing Microsoft credentials — a capability called Single Sign-On (SSO).
The flow works as follows: the Sprout Admin and Entra Admin exchange two pieces of information, then configure their respective systems. A test user then verifies the connection.
Handoff Flow:
|
Sprout Admin (Keycloak) Copy of SSO Integration: Microsoft Entra ID (SAML2.0) v1 |
Entra Admin (Microsoft Entra) Copy of SSO Integration: Microsoft Entra ID (SAML2.0) v1 |
End User (Tester) Copy of SSO Integration: Microsoft Entra ID (SAML2.0) v1 |
|
Step 1: Generate Entity ID & Redirect URI |
— |
— |
|
Share Entity ID + Redirect URI ➔ |
➔ Receive & input into SAML configuration |
— |
|
— |
Step 2: Configure SAML app, claims, and user assignments |
— |
|
➔ Receive & paste Metadata URL |
Share Federation Metadata URL ➔ |
— |
|
Step 3: Set NameID policy, custom authentication flows, and save |
— |
— |
|
— |
— |
Step 4: Test SSO login and confirm initial account linking |
Glossary of Technical Terms
|
Term |
Plain-Language Definition |
|
SSO (Single Sign-On) |
An authentication scheme letting users log in once to access multiple applications without re-entering credentials. |
|
SAML 2.0 |
An open standard for exchanging authentication and authorization data securely between systems. |
|
Microsoft Entra ID |
Microsoft’s cloud identity and access management service (formerly Azure AD). |
|
Keycloak |
The core identity management platform used internally by Sprout HR. |
|
Entity ID |
A unique identifier (URL) representing Sprout in communication with Microsoft Entra. |
|
Redirect URI / Reply URL |
The endpoint (ACS URL) where Entra returns the user post-authentication. |
|
Federation Metadata URL |
An XML URL from Microsoft containing certificate and endpoint details for Keycloak. |
|
NameID |
The key attribute used to match users between systems (configured to email address). |
Integration Steps
|
1 |
[Sprout Admin] Generate Entity ID and Redirect URI |
The Sprout Admin generates two values that will be handed off to the Entra Admin to configure Microsoft's side of the integration.
|
👤 Sprout Admin — Where to do this Keycloak Admin Console > Select your tenant realm > Identity Providers > Add Provider > SAML v2.0 |
Step 1a — Enter the Alias and Display Name
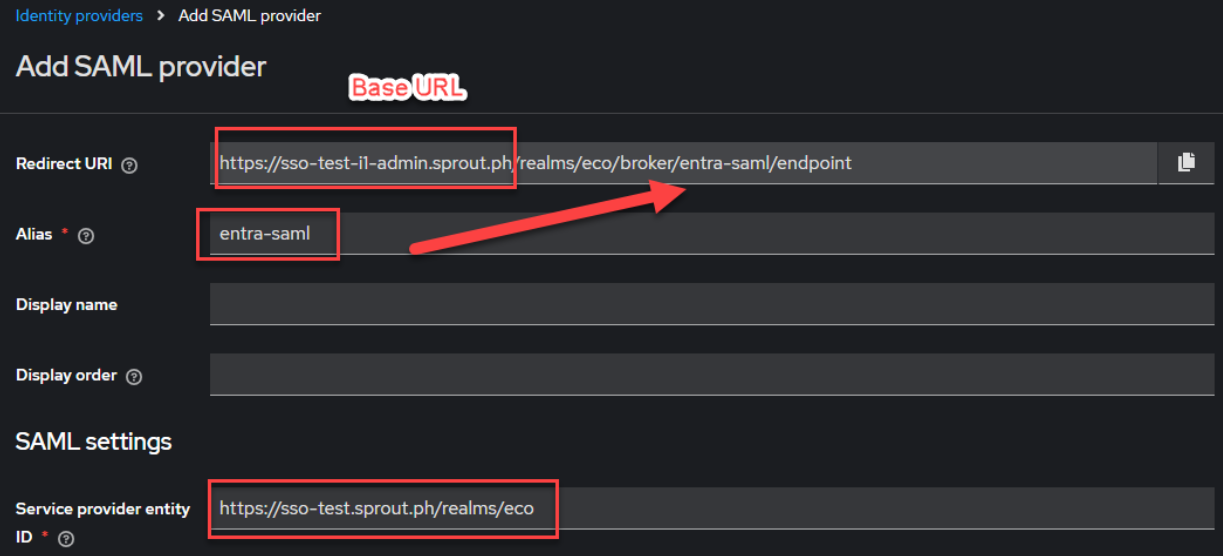
The Alias is a short internal name (e.g. entra-saml). It will automatically form part of the Redirect URI, so choose something clear and consistent.
Step 1b — Set the Base URL
Update the Base URL to match your environment:
- Production: https://sso.sprout.ph
- Sandbox: https://sso-sandbox.sprout.ph
Step 1c — Note the Generated Values
Once saved, Keycloak will generate the following two values. Write these down — you will give them to the Entra Admin in the next step.
|
Value |
Example |
|
Redirect URI (also called Reply URL / ACS URL) |
https://sso.sprout.ph/realms/eco/broker/entra-saml/endpoint |
|
Entity ID (also called Identifier) |
https://sso.sprout.ph/realms/eco |
|
ℹ️ Handoff Required Share the Redirect URI and Entity ID with your Entra Admin before proceeding to Step 2. |
|
2 |
[Entra Admin] Create and Configure the SAML Enterprise Application |
The Entra Admin sets up Sprout as a trusted application inside Microsoft Entra ID and configures how users will be authenticated.
|
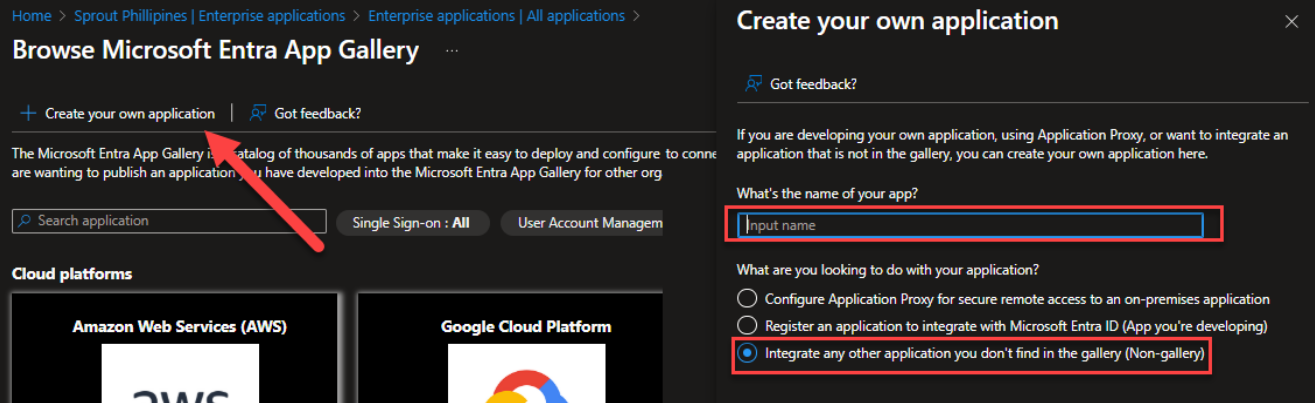
👤 Entra Admin — Where to do this Microsoft Entra ID (portal.azure.com) > Enterprise Applications > New Application > Create your own application |
Step 2a — Create the Application
- Enter a name for the app (e.g. Sprout).
- Select: Integrate any other application you don't find in the gallery (Non-gallery).
- Click Create.
Step 2b — Configure Single Sign-On with SAML
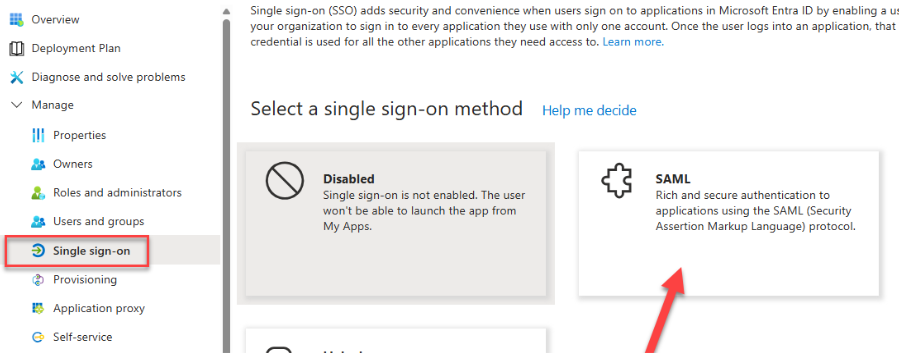
- In the app's left menu, go to Single sign-on.
- Select SAML as the sign-on method.
- In the Basic SAML Configuration section, enter the values received from the Sprout Admin:
- Identifier (Entity ID): paste the Entity ID from Step 1
- Reply URL (Assertion Consumer Service URL): paste the Redirect URI from Step 1
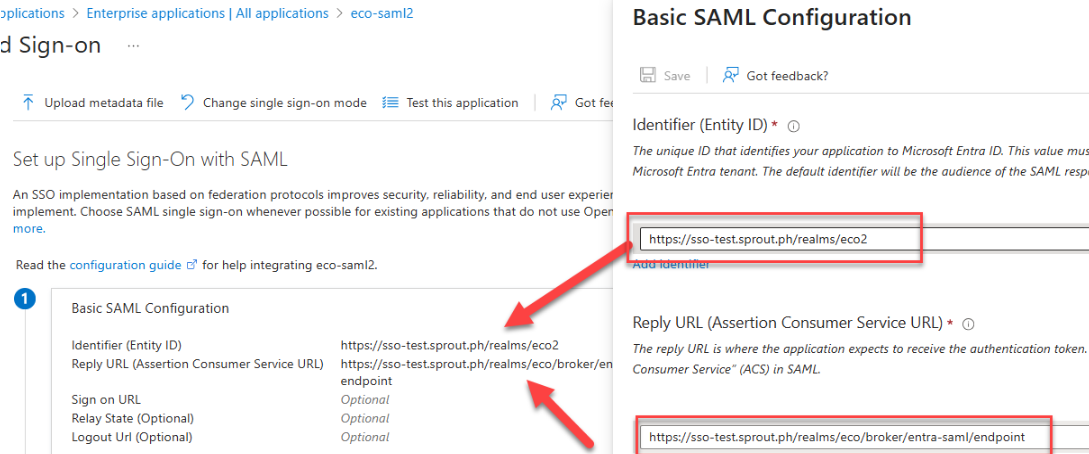
- Click Save.
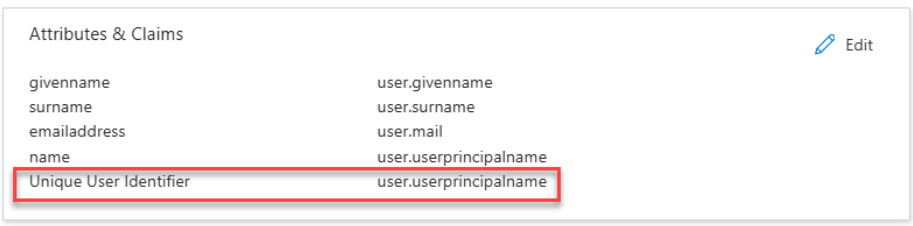
Step 2c — Verify Attributes & Claims
In the Attributes & Claims section, confirm the following default mapping is in place:
|
Claim |
Value |
|
Unique User Identifier (Name ID) |
user.userprincipalname |
|
givenname |
user.givenname |
|
surname |
user.surname |
|
emailaddress |
user.mail |
|
name |
user.userprincipalname |
|
ℹ️ Important Do not change the Unique User Identifier. It must remain set to user.userprincipalname for account matching to work correctly. |
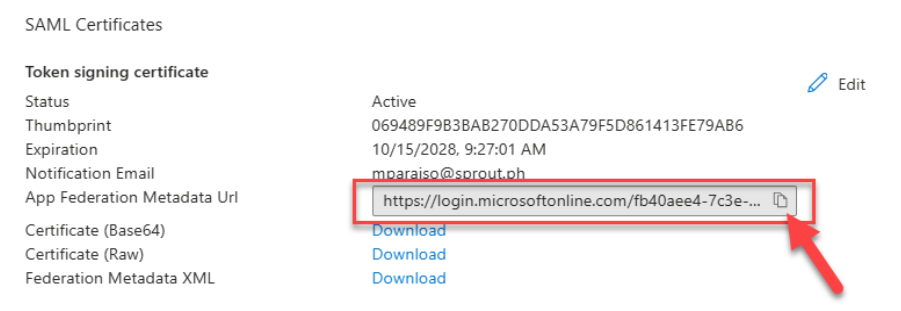
Step 2d — Copy the Federation Metadata URL
In the SAML Certificates section, locate and copy the App Federation Metadata URL. It will look similar to:
https://login.microsoftonline.com/{tenant-id}/federationmetadata/2007-06/federationmetadata.xml?appid={app-id}
|
ℹ️ Handoff Required Share this Federation Metadata URL with your Sprout Admin. They will need it for Step 3. |
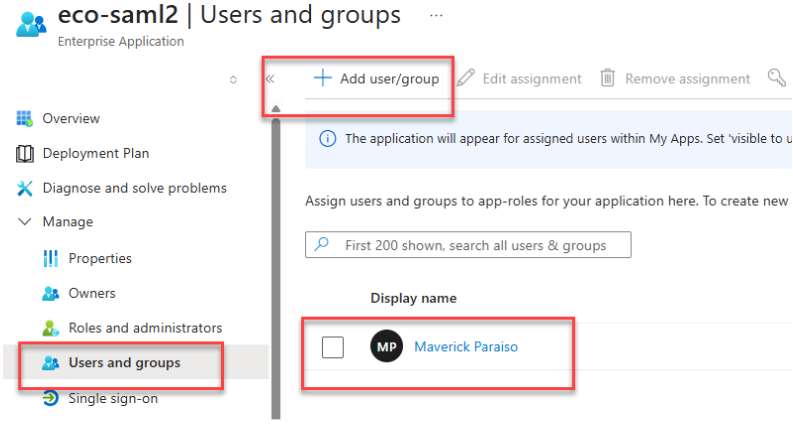
Step 2e — Assign Users
Before any user can log in via SSO, they must be assigned to this Enterprise Application.
- In the app's left menu, go to Users and groups.
- Click Add user/group.
- Assign all users (or groups) who should be able to access Sprout via SSO.
|
⚠️ Do Not Skip This Step Users who are not assigned to the Enterprise Application will receive an error when attempting SSO login, even if their account exists in both systems. |
|
3 |
[Sprout Admin] Configure Keycloak SAML Settings |
The Sprout Admin now completes the Keycloak configuration using the Federation Metadata URL received from the Entra Admin.
|
👤 Sprout Admin — Where to do this Keycloak Admin Console > Identity Providers > Select your Entra SAML provider > Edit |
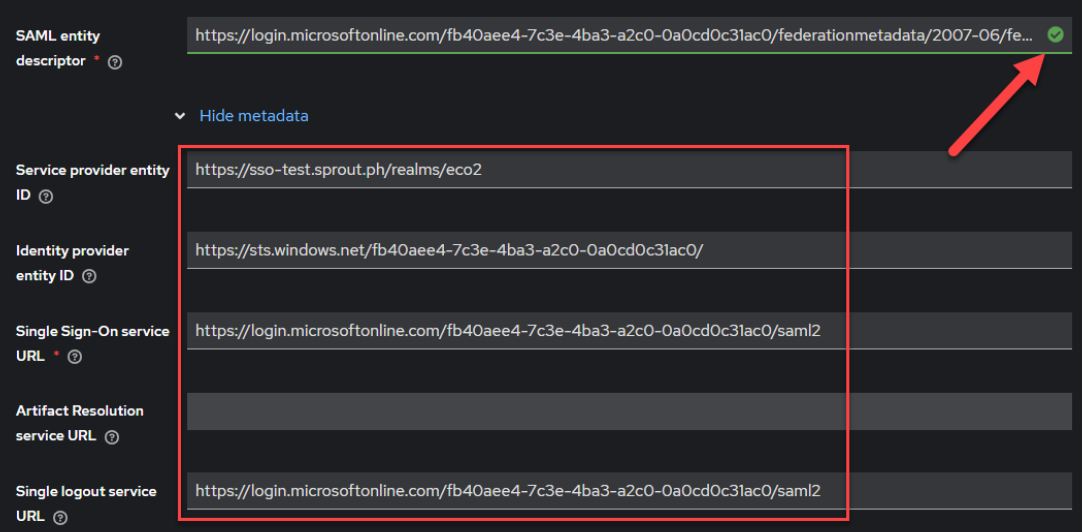
Step 3a — Import Federation Metadata
- In the SAML entity descriptor field, paste the Federation Metadata URL received from the Entra Admin.
- Keycloak will automatically populate all required SSO settings (SSO URL, Logout URL, Identity Provider Entity ID).
- Verify that the fields have been filled in before saving.
Step 3b — Set the NameID Policy Format
- Navigate to: Identity Providers > Provider Details > Settings.
- Find the NameID Policy Format field.
- Change it from the default (Subject NameID) to Email.

|
⚠️ Must Be Set to Email Leaving this at the default 'Subject NameID' will prevent account linking from working. The system uses email address to match Entra users with existing Sprout accounts. |
Step 3c — Set the Authentication Flow
Navigate to Identity Providers > Provider Details > Settings > Advanced Settings.
- Ensure the built-in 'First Broker Login' flow is NOT used.
- Set the First Login Flow Override to the custom SAML flow (e.g. saml-login).
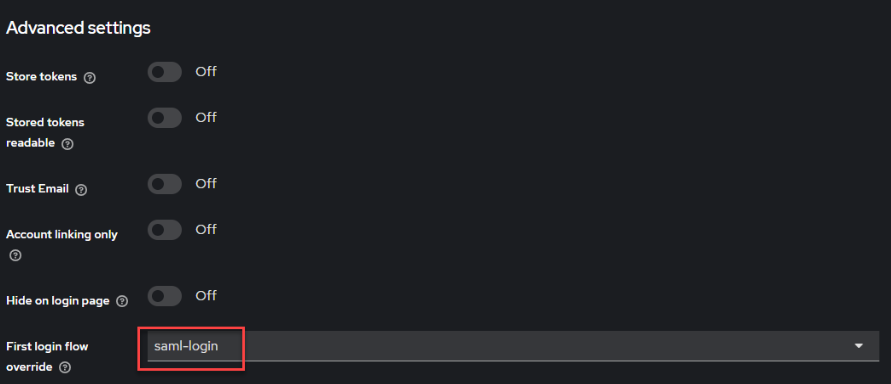
Then go to Authentication > Flows and confirm that your selected flow includes all of the following steps:
|
# |
Step Description |
Setting |
|
1 |
Detect existing broker user |
Required |
|
2 |
User creation or linking |
Required |
|
3 |
[Provider] Handle Existing Account |
Alternative |
|
4 |
Confirm Link Existing Account |
Required |
|
5 |
[Provider] Account verification options |
Required |
|
6 |
Verify Existing Account by Email |
Alternative |
|
7 |
[Provider] Verify Existing Account by Re-authentication |
Alternative |
|
8 |
Username Password Form for IDP re-authentication |
Required |
|
9 |
[Provider] First broker login - Conditional OTP |
Conditional |
|
10 |
Condition - user configured |
Required |
|
11 |
OTP Form |
Required |
|
4 |
[End User] Test the SSO Login |
A test user now verifies that the integration is working correctly. This user must have an active account in both Sprout and Entra, using the same email address.
|
👤 End User — Where to do this Open your Sprout HR URL (e.g. https://sprout.hrhub.ph) in a browser. |
Step 4a — Initiate SSO Login
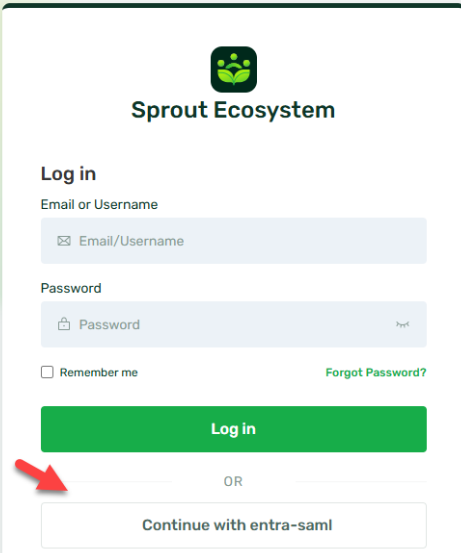
- On the Sprout login page, look for the button below the standard login form (e.g. Continue with entra-saml).
- Click this button. You will be redirected to the Microsoft login page.
- Sign in with your Microsoft/Entra credentials.
Step 4b — First-Time Account Linking
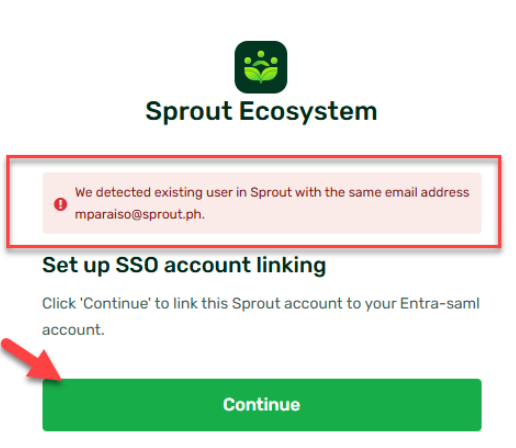
If this is your first time logging in via SSO, Sprout will detect your existing account and prompt you to link it:
- A message will appear: 'We detected an existing user in Sprout with the same email address.'
- Click Continue to proceed with account linking.
- An email will be sent to your address with a Confirm Account Linking button.
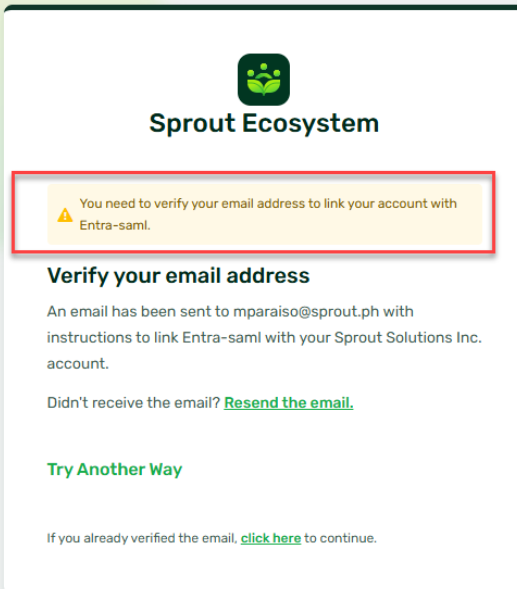
- Open the email and click Confirm Account Linking. The link expires in 5 minutes.
- You will be redirected to the Sprout dashboard. Setup is complete!
|
ℹ️ Subsequent Logins After the first-time linking, users simply click the SSO button and sign in with Microsoft — no further email confirmation is needed. |
In addition to logging in directly from the Sprout URL, users can also launch Sprout from their Microsoft MyApps portal (myapps.microsoft.com). This is especially useful in organisations where employees use MyApps as a central launchpad for all their work applications.
|
👤 Entra Admin — Where to do this Microsoft Entra ID > Enterprise Applications > [Your Sprout App] |
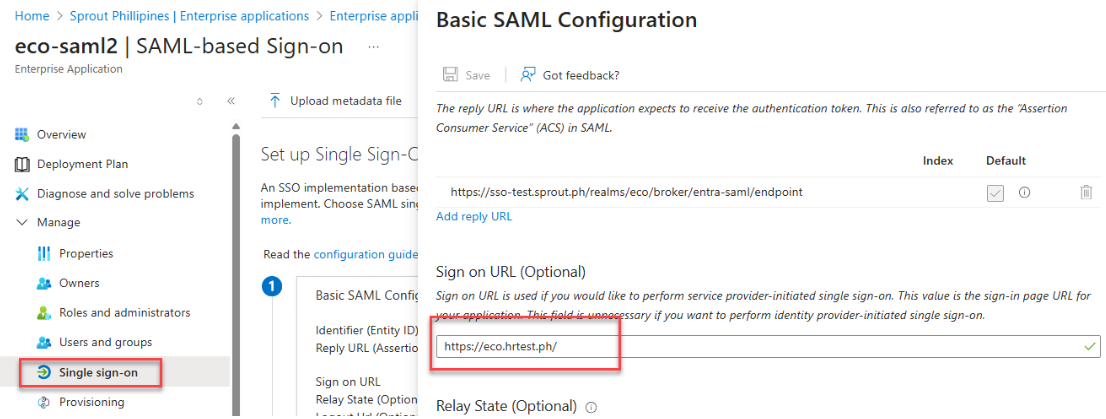
5a — Set the Sign-On URL
- Go to Single sign-on > Basic SAML Configuration > Edit.
- Enter the Sign on URL field with your Sprout HR URL (e.g. https://sprout.hrhub.ph).
- Save changes.
5b — Make the App Visible to Users
- Go to Properties in the app's left menu.
- Set Visible to users? to Yes.
- Optionally, upload the Sprout logo (available from your Sprout account manager) for easier identification in MyApps.
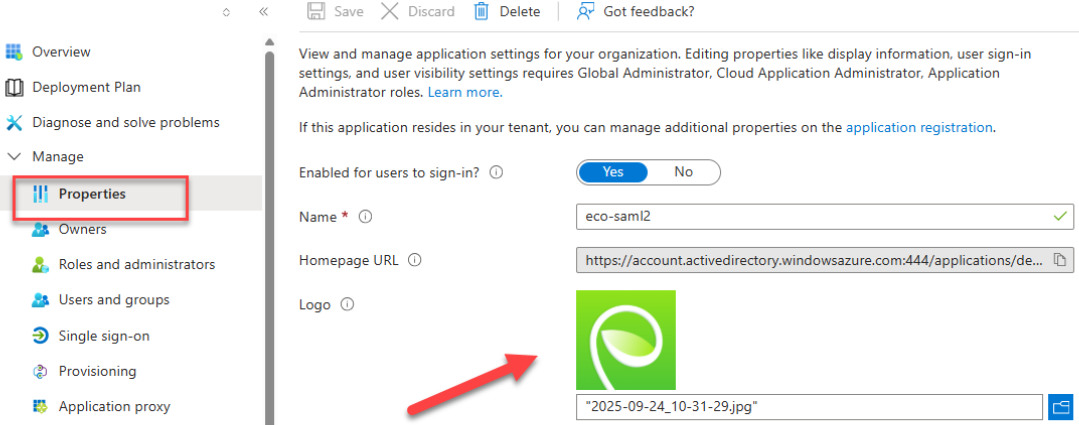
Once configured, all assigned users will see the Sprout tile when they visit https://myapps.microsoft.com.
Optional: Auto-Redirect to Microsoft LoginBy default, users see the standard Keycloak login page with an option to continue via SSO. This optional configuration skips the Keycloak page entirely and sends users straight to the Microsoft login page.
|
⚠️ Session Loop Warning If a user is already signed in to Microsoft when they log out of Sprout, they may be automatically redirected back into Sprout without seeing a logout screen. This is expected behaviour — session management for SSO users is controlled by Microsoft Entra, not Sprout. If no active Entra session exists, the user will be correctly taken to the Microsoft login page. |
|
👤 Sprout Admin — Where to do this Keycloak Admin Console > Authentication > Flows > browser > Identity Provider Redirector > Settings (gear icon) |
- Alias: enter the same alias used in Step 1 (e.g. entra-saml).
- Default Identity Provider: enter the same alias again.
- Save.
To verify: open your Sprout HR URL. You should be taken directly to the Microsoft sign-in page instead of the Keycloak login page.
Quick Reference — Values Exchanged
Use this table as a checklist during the setup session to track the values that need to be shared between admins.
|
Value |
Generated By |
Shared With |
Used In |
|
Entity ID |
Sprout Admin (Step 1) |
Entra Admin |
Step 2b — Identifier (Entity ID) field |
|
Redirect URI (Reply URL) |
Sprout Admin (Step 1) |
Entra Admin |
Step 2b — Reply URL field |
|
Federation Metadata URL |
Entra Admin (Step 2d) |
Sprout Admin |
Step 3a — SAML entity descriptor field |
Troubleshooting
Below are the most common issues encountered during and after setup. For issues not listed here, contact Sprout Support.
|
Issue |
Likely Cause |
What to Check |
|
User not receiving account linking email |
Email delivery issue or incorrect email mapping |
Confirm the email in Sprout matches the email in Entra exactly (including case). Check spam/junk folder. |
|
Error: AADSTS50105 — user not assigned |
User not assigned to the Enterprise Application in Entra |
Go to Entra > Enterprise Applications > Users and groups, and add the user (Step 2e). |
|
Redirect URI mismatch error |
The Reply URL in Entra does not exactly match the Redirect URI from Keycloak |
Compare the two values character by character, including trailing slashes. Re-enter if needed. |
|
Login loop after SSO logout |
User still has an active Entra session |
Expected behaviour — this is controlled by Microsoft. User should sign out of Microsoft first to fully log out. |
|
Redirected to Keycloak login instead of Microsoft |
Auto-redirect not configured, or Identity Provider Redirector alias is incorrect |
Check Section 6 (Optional Auto-Redirect). Verify the alias matches exactly. |
|
Login works but user lands on wrong page |
Sign-On URL in the Enterprise Application is not set |
Check Step 5a — set the Sign-On URL to your Sprout HR URL. |
|
NameID error or account not found |
NameID Policy Format is set to Subject NameID instead of Email |
Check Step 3b — change the NameID Policy Format to Email. |
Got a question or need extra help? Sidekick makes it easy — get answers, raise a ticket, or schedule a call with our experts, all in one place.