
The Approval Center Widget, being one of the most utilized panels on the Manager and Admin Dashboard, has its quick access icons that Managers and Admins may find convenient to use when in a hurry in approving, rejecting or resending applications such as Leaves, Certificate Of Attendances, Schedule Adjustments, Overtimes, Undertimes, and Official Businesses that are displayed here for their action.
Kindly note that due to system design and size considerations, only 5 entries can be accommodated here (You may also see this KB article for your reference: Approval Center -- Why Can't I View Everything in One Go?). With this, Managers and Admins might take a look if the application they are looking for is displayed here and have it quickly approved, reject or resend it in a snap!
Here's how the quick access icons look like in the Approval Center widget:
(Note: We have used Leaves as our examples below but other applications such as Certificate Of Attendances, Schedule Adjustments, Overtimes, Undertimes, and Official Businesses can also be found under the My Requests tab)
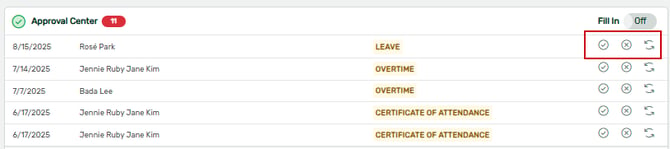
Let us now proceed to briefly discuss each three quick access icons from each application displayed in the Approval Center widget for everyone's reference!
The Approve Icon


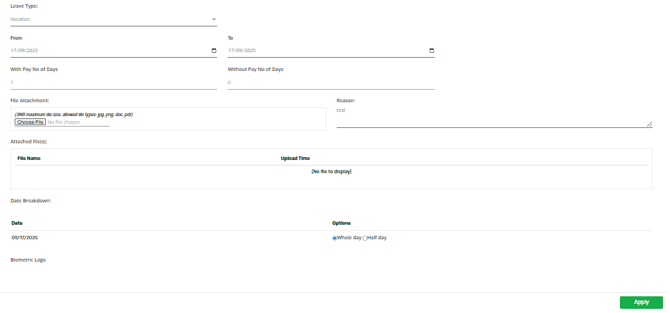
Once you have clicked the ✔ icon, the application details will be displayed and you will be able to click on the Approve button to completely confirm this application! Once an application has been approved, this will then reflect on the employee's Approved tab under My Requests > My Leaves.
The Reject Icon


Upon clicking the ✖ icon, the application details will show up for checking and a reject reason will also be displayed for approvers to input or state the reason why the application has been rejected for the employee's reference. Once the Manager/Admin rejects the application, this will now go to the employee's Rejected/Canceled tab under My Requests > My Leaves.
The Resend Icon


When the approver clicks on the ⟳ icon, the details of the application will then be displayed along with the resend reason where you can input details as to why you are resending the application for the employee to modify and edit as needed. Once resent, the application will reflect on the Pending/Resubmitted For Editing under My Requests > My Leaves tab of the employee.
For the employees whose applications were resent, they may edit this by doing the following:
- Under the Pending/Resubmitted For Editing tab, click the Update button

- Make the necessary updates as needed
- Click the Apply button below
Once the employee is done with the instructions mentioned, the employee's application will again reflect on the Manager/Admin's Approval Center.
And just like that, you can now utilize these three quick access icons in the Approval Center Widget and swiftly make actions to employee's applications!
Want real-time responses? Explore Sidekick, your 24/7 guide for product inquiries!