
Overview
Signing in and finding your way around Command Center is covered in the Command Centre - Admin — Guide.
The Employee Offboarding Module lets HR Admins run exit clearance and exit interviews for departing employees entirely inside Command Center. Three roles interact with it:
- HR Admin — configures templates, creates and monitors records, and has full edit access across the whole record. See Step-by-Step: First-Time Setup (HR Admin) onward.
- Section Assignee — a department head who clears their scoped items, notified via both a CC To-Do task and an email in parallel mode, or a section-unlock email in sequential mode. See Step-by-Step: Clearing Your Section (Section Assignee).
- Departing Employee — accesses a magic-link portal, no Sprout HR login needed. See Step-by-Step: Completing Your Offboarding (Departing Employee).
Offboarding is available on every Command Center account — there is nothing to switch on and nothing to request. What each account does need first is its own templates: no departure record can be created until your clearance checklist exists and is Active. Your HR Admin sets these up under Workflow → Templates, with help from your Sprout Implementation contact.
A fourth participant can also appear on a record: the Company Signatory — someone the HR Admin delegates to sign the quitclaim on the company's behalf, often outside HR entirely (e.g., a Finance representative). They receive their own direct notification email with a link to the signing view; see the quitclaim step under HR Admin monitoring below.
Step-by-Step: First-Time Setup (HR Admin)
- Configure your templates via Workflow → Templates, before creating your first departure record:
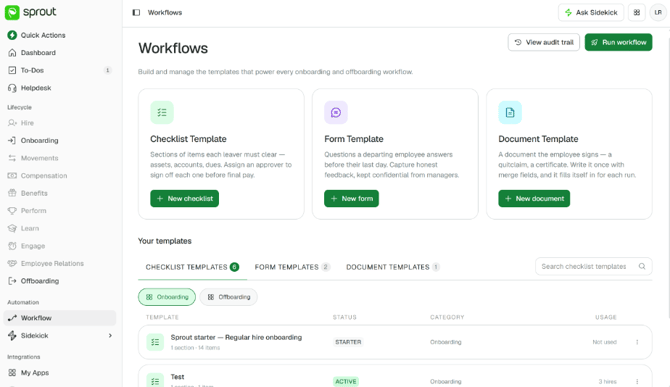
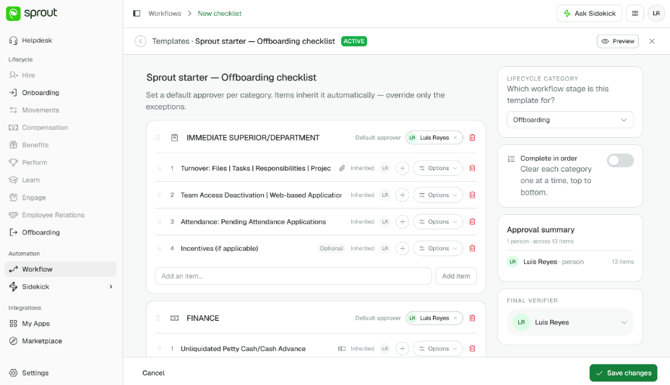
- Clearance Checklist — sections, items, attachment requirements, default assignees per section. A Sprout Starter template is preloaded as a read-only baseline: it carries a Starter chip instead of a Draft/Active status, it cannot be edited, and its only row action is Duplicate — there is no Set as default, no Delete, and no publish/unpublish toggle on it. It also does not appear in the template dropdown when you create an onboarding or offboarding record, so you cannot run a record off the starter directly. Duplicate it to get your own editable copy (or build one from scratch), then publish that. Templates you create do support Duplicate, Set as default, and Delete (delete is permanent — there's no archived state or undo, so duplicate first if you want a variant), alongside the normal Draft ↔ Active publish/unpublish toggle.
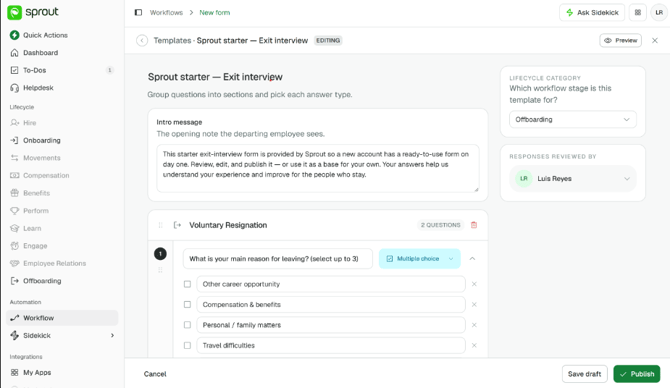
- Exit Interview Form — intro message and question sections (8 question types available). The builder also carries a response reviewer setting, but it does not restrict access today. Submitted responses are reached through the Offboarding list, which is HR Admin-gated, and there is no second surface where a named reviewer could read them — so any HR Admin can open any response, whoever is named. There is no way to narrow that audience in this release; if your exit interviews are treated as confidential, plan around that. (Section-level forking/branching can likewise be configured in the builder but does not take effect yet — every question renders in a fixed sequence regardless of earlier answers, so build your form as a single straight-through set.)
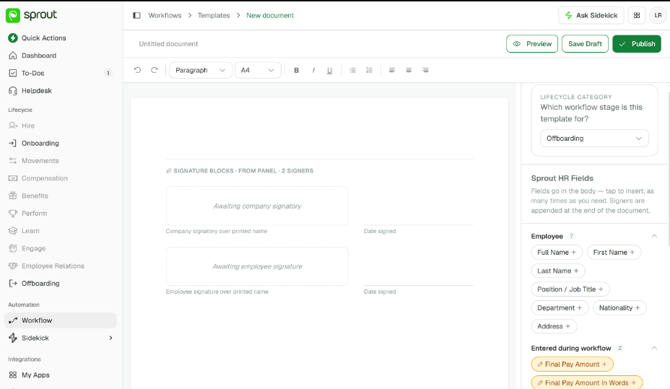
- Open it from Workflow → Manage Templates → Documents → New document. You get a single flowing document canvas with a formatting toolbar (undo/redo, paragraph/heading styles, bold/italic/underline, bulleted/numbered lists, alignment).
- Insert merge fields either by clicking a chip in the Sprout HR Fields panel, or by typing
{{for an autocomplete popover. Fields are grouped by Employee (Full Name, First Name, Last Name, Position, Department), Offboarding (Last Working Day, Separation Type), and Document (Company Name, Date Today, Final Pay Amount — Numbers and Words). - Watch the color: most merge-field chips render green; the Final Pay Amount chips render amber with a pencil icon — that's your visual cue that this field resolves in two phases (a placeholder at record creation, then the real figure once the HR Admin enters it at the Move to Quitclaim Release step).
- The Signers panel has two toggles — Company Signatory and Employee — both on by default. Turning either off removes its signature block from the document footer live as you edit.
- Saving publishes the template as Active immediately — there's no separate draft/publish step for quitclaim documents like there is for the checklist and exit interview form.Quitclaim Document — compose via the Document Builder. Uploading a finished document is not a way to create one:
- Clearance Checklist — sections, items, attachment requirements, default assignees per section. A Sprout Starter template is preloaded as a read-only baseline: it carries a Starter chip instead of a Draft/Active status, it cannot be edited, and its only row action is Duplicate — there is no Set as default, no Delete, and no publish/unpublish toggle on it. It also does not appear in the template dropdown when you create an onboarding or offboarding record, so you cannot run a record off the starter directly. Duplicate it to get your own editable copy (or build one from scratch), then publish that. Templates you create do support Duplicate, Set as default, and Delete (delete is permanent — there's no archived state or undo, so duplicate first if you want a variant), alongside the normal Draft ↔ Active publish/unpublish toggle.
- Confirm each template shows Active status before proceeding — a template in Draft status cannot be used on a new departure record, and the preloaded Sprout Starter does not count (it is never selectable on a record). You need all three of your own templates Active to run a departure end to end, though they bite at different points: the clearance checklist gates creating the record, the exit interview form is needed only if you are running an exit interview (you can opt out per departure), and the quitclaim document is needed by the time you release the quitclaim — no record can reach Completed without one.
Step-by-Step: Creating a Departure Record (HR Admin)
- From the Offboarding page under Lifecycle, select New offboarding — this opens the Add Departure page directly.
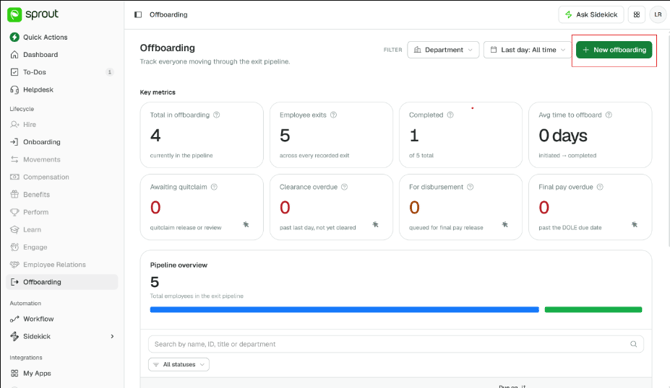
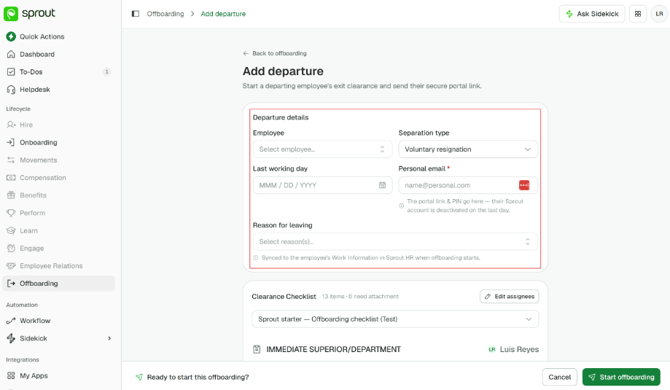
- Departure details: enter the departing employee, separation type, last working day, and their personal email (this is where the magic-link portal invite will go).
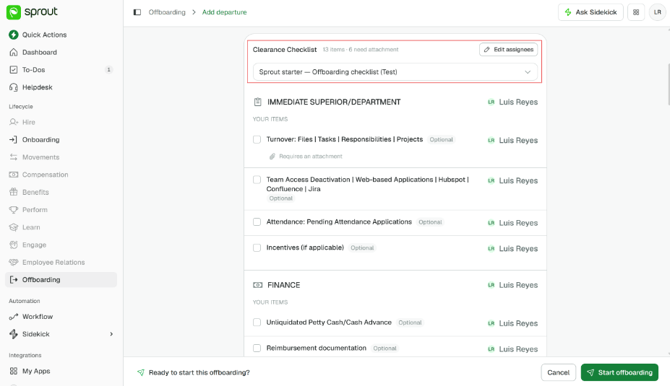
- Template selection: choose the clearance checklist template and the exit interview form. Your account defaults are pre-selected if you have set them; any Active template can be selected instead, or you can opt out of the exit interview for this departure. Sprout Starter templates are not listed here.
- Section assignees: the checklist card shows each section's default assignee from the template. Use Edit approvers to change any of them for this departure — your changes apply to this record only and never modify the account template. This works at two levels: you can override the assignee for a whole section, or for an individual item within a section. Every section must resolve to a real person before the record can be created.
- Each section also has an Assignee Type — Immediate Supervisor or Individual Employee. Immediate Supervisor auto-resolves live from the selected departing employee's Sprout HR profile (and re-resolves if you change the employee field, though it's only locked in as a snapshot when you save). If it can't resolve a supervisor, you'll see a warning and need to switch that section to Individual Employee — the picker for that mode surfaces the employee's supervisor at the top under a "Suggested" label, if one exists.
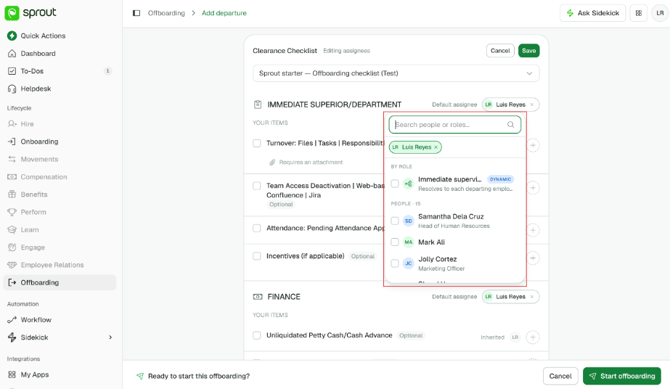
- The Start offboarding validation checks that every section actually resolves to a real, reachable person, not just that an assignee type is selected — a section typed to Immediate Supervisor whose supervisor can't be resolved will still block you, and the checklist card auto-opens in edit mode with inline errors pointing at exactly which sections need fixing.
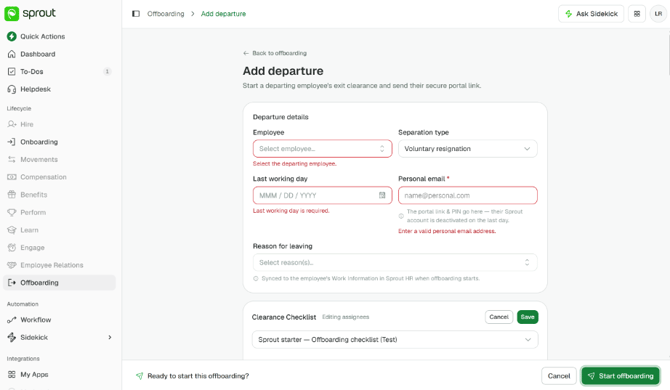
- Each section also has an Assignee Type — Immediate Supervisor or Individual Employee. Immediate Supervisor auto-resolves live from the selected departing employee's Sprout HR profile (and re-resolves if you change the employee field, though it's only locked in as a snapshot when you save). If it can't resolve a supervisor, you'll see a warning and need to switch that section to Individual Employee — the picker for that mode surfaces the employee's supervisor at the top under a "Suggested" label, if one exists.
- Review and start: the clearance checklist and exit interview form appear as read-only previews of the selected templates. Sections and items cannot be added, removed, or reordered — not here, and not after the record is saved. Structural changes are made in Workflow → Templates. Select Start offboarding to create the record.
Step-by-Step: Monitoring and Managing Records (HR Admin)
- The Offboarding list shows every active record with a status badge and a last-day countdown. A Due on column carries each record's DOLE final-pay deadline — the last working day plus 30 calendar days. Once a record passes that deadline, a red N days overdue note appears beneath the date in the same cell, and stops once the record is Completed. Records whose clearance was not finished on or before the employee's last day carry a Clearance overdue warning, with no grace period.
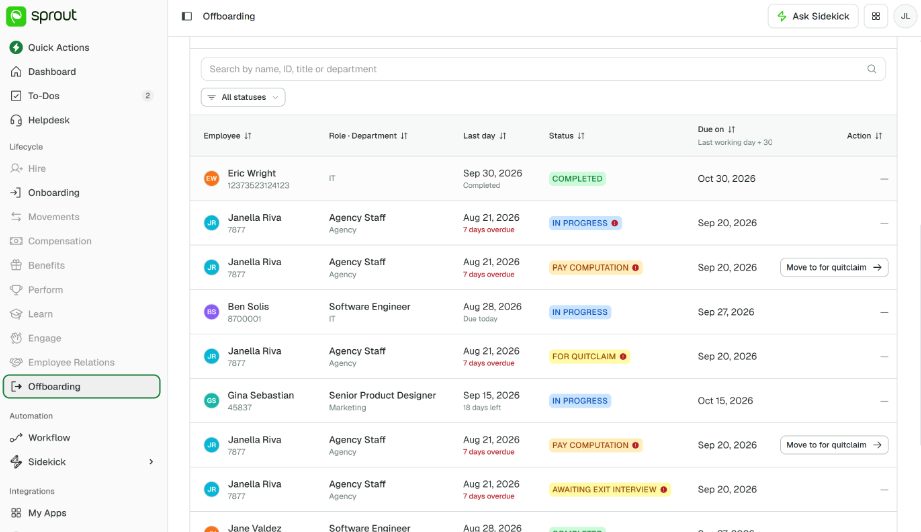
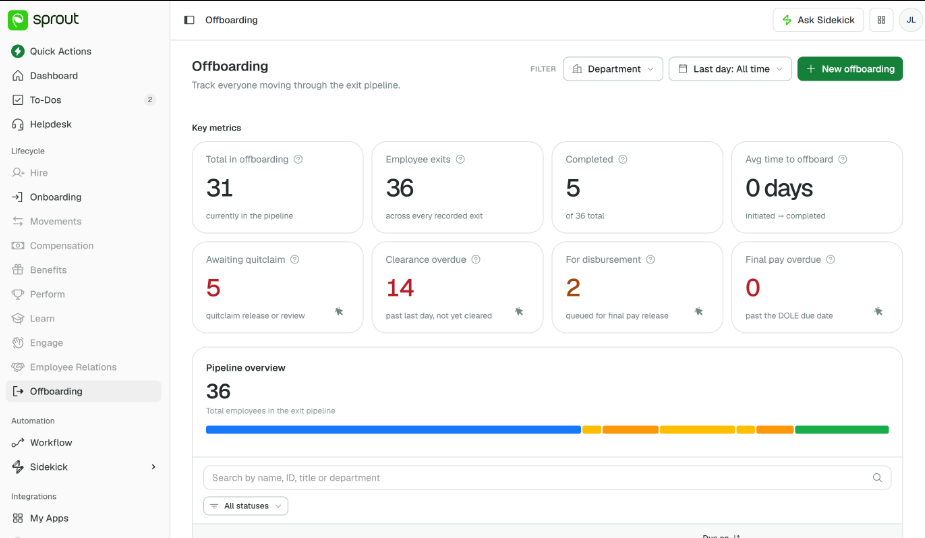
- Above the list, eight Key metrics cards summarise where everyone sits: Total in offboarding, Employee exits, Completed, Avg time to offboard, Awaiting quitclaim, Clearance overdue, For disbursement, and Final pay overdue (records past the DOLE due date). These are current-snapshot counts for this list; historical trend data across multiple exit cohorts lives on Command Center's separate Lifecycle Metrics page, not here.
What each metric means
- Total in offboarding — Employees currently in the offboarding process.
- Employee exits — Employees whose last day falls within the selected date range.
- Completed — Fully offboarded — quitclaim reviewed and the exit complete.
- Avg time to offboard — Average days from the workflow being initiated to the exit being completed (quitclaim reviewed and final pay released); completed exits only.
- Awaiting quitclaim — Quitclaim released or under review, not yet cleared.
- Clearance overdue — Clearance and signing still unfinished after the last day, counted from the last day itself (no grace period).
- For disbursement — Final pay still pending release.
- Final pay overdue — Exits not yet completed once the DOLE window has closed. Final pay is due within 30 calendar days of the last working day (Labor Advisory No. 06-20), so a record counts from day 31 onward; counts every stage.
- Open any record's detail drawer for two tabs:
- Details — progress, quitclaim status, per-section assignees shown inline, and a Resend invite action. Resending regenerates both the magic link and the PIN together in one action and invalidates the previous ones — there's no way to resend just one or the other, and every resend is logged to the audit trail.
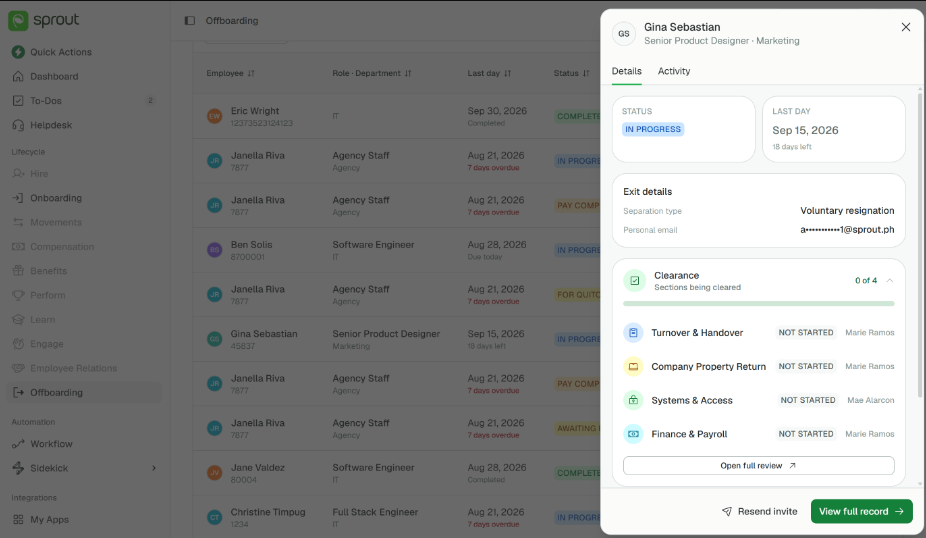
- Activity — the full, immutable audit trail, presented as a day-grouped timeline (newest day first, newest event within each day first).
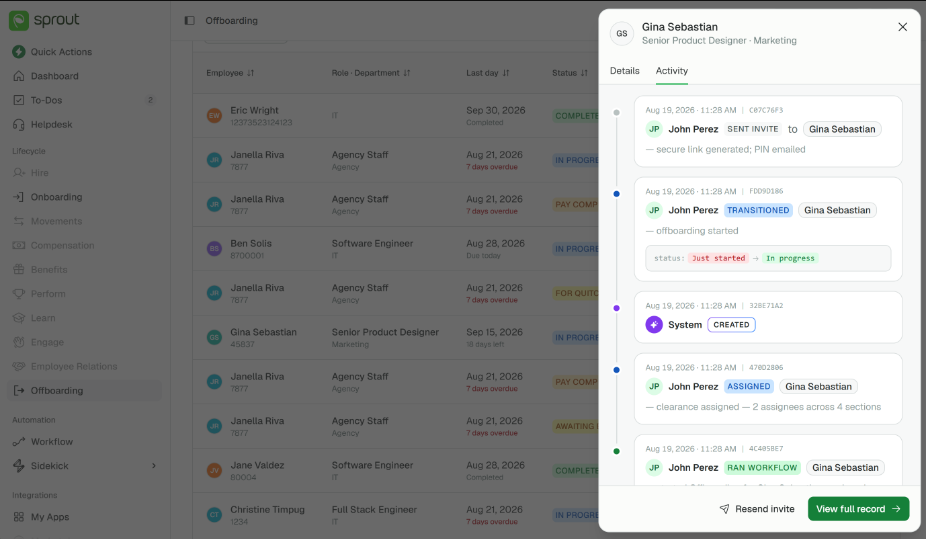
- Details — progress, quitclaim status, per-section assignees shown inline, and a Resend invite action. Resending regenerates both the magic link and the PIN together in one action and invalidates the previous ones — there's no way to resend just one or the other, and every resend is logged to the audit trail.
- As HR Admin, you have full edit access to every section of the clearance form, even sections assigned to someone else — each completed item shows who did it and when.
- When all clearance is complete, the record advances automatically (through an exit-interview gate if one is required and not yet submitted) to For Final Pay Computation.
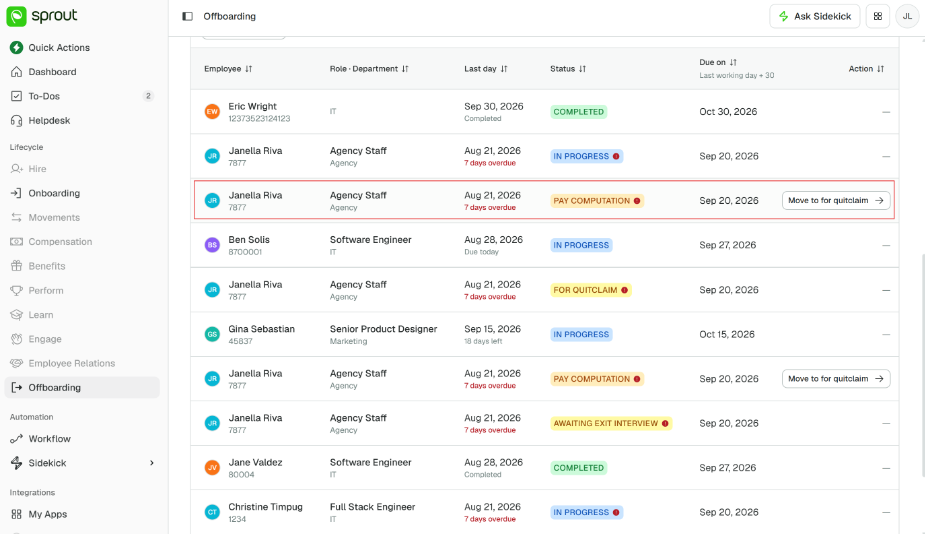
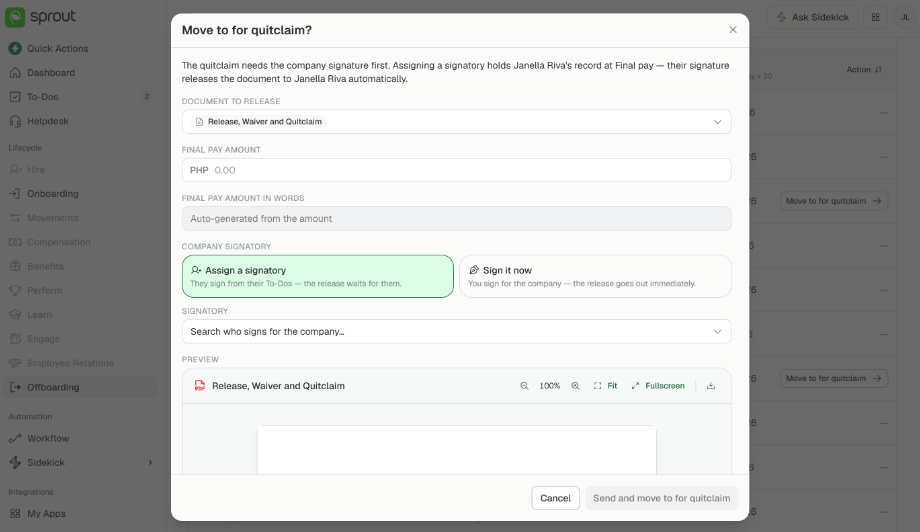
- To move the record forward from there, open Move to Quitclaim Release: pick a quitclaim document template, enter the Final Pay Amount (numeric — it's peso-prefixed, digits-only, and formats itself with thousands separators as you type; the written-out "Final Pay Amount in Words" field is read-only and derives automatically from what you typed, you can't edit it directly). If the selected template has Company Signatory enabled, you'll also choose Assign (the record waits at this stage until your designated signatory signs) or Sign now (you sign inline yourself and the record advances immediately). If the template has no Company Signatory, confirming releases the quitclaim straight to the employee.
- The departing employee then e-signs via their portal — this triggers the record to For Review. Open the Review quitclaim dialog from the Details tab: it shows the submission's evidence first (file name, timestamp, a "Signed in portal" badge, and a Download copy button) before you act. Confirming asks for a second, explicit confirmation — this is deliberate friction, since clearing a quitclaim can't be undone — and advances the record to For Disbursement. If you instead choose Request re-sign, you must enter a reason; the record reverts to For Quitclaim Release, the employee gets a notification carrying your stated reason, and they re-sign through the same portal flow.
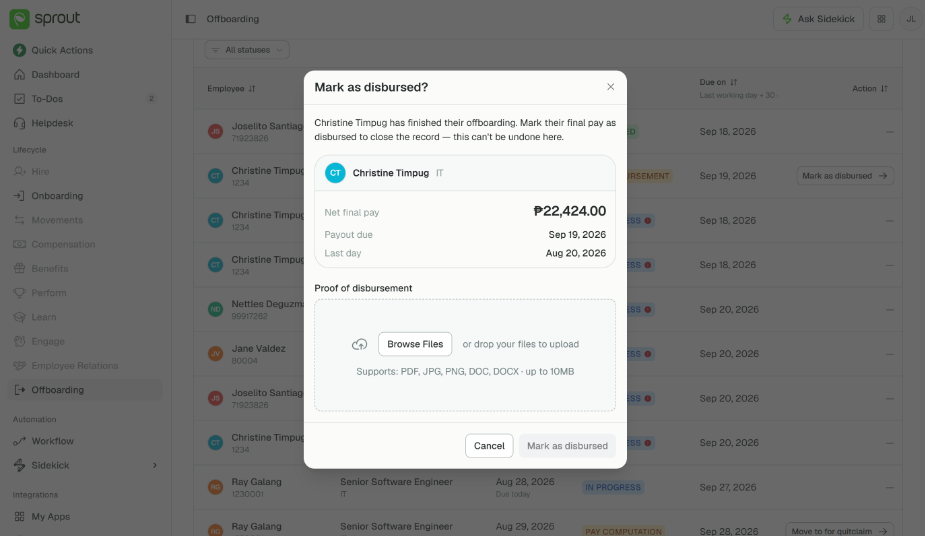
- To close the record, upload proof of disbursement — this is required and is itself the "Mark as Disbursed" action, which moves the record to Completed.
If something goes wrong:
- Wrong section assignee, or the assignee has since left the company: the approver can't be changed once the record exists, and there's no cancel-and-recreate path either (separation cancellation is unbuilt). This doesn't need Support — complete the affected section yourself, as you can with any section, and work the record as it stands.
- A section shows a count ("2 assignees") instead of names: a display issue that can appear on any account, whatever its size — the section renders a count where the assignee's name and avatar should be. It doesn't affect the assignments, the clearance data or any sign-off; confirm the assignee from the record, or contact them directly. A fix is already scheduled.
- You have questions about how a departing employee's personal email is stored or retained: raise them with your Customer Success Manager rather than working from assumptions — this module sends to personal addresses, so the data-handling answer needs to come from Sprout directly.
- The module is there but records won't behave as expected: check that all three templates — clearance checklist, exit interview form and quitclaim document — are set up and Active for your account. An incomplete template set accounts for most of these reports, and since there is nothing else to switch on, it is the first thing to rule out. If all three are Active and it still misbehaves, contact Sprout Support.
- A departing employee still can't reach their portal after a fresh resend of their link and PIN: stop retrying and contact Sprout Support with the record ID. Portal access doesn't run on their Sprout HR login, so there's nothing further to fix from your side.
Step-by-Step: Clearing Your Section (Section Assignee)
You use your normal Sprout HR credentials — there's no separate login for this. Access is scoped to your own section only; every other section on the record is read-only to you.
- Get notified. In parallel mode you receive both a CC To-Do task and an email as soon as the departure record is created with you assigned. In sequential mode — where sections must clear in order — you instead get a section-unlock email once every preceding section (owned by someone else) is fully cleared; there's no CC To-Do until then. If you own two or more sections back-to-back in the sequence, your own sections don't gate on each other — only the nearest preceding section owned by a different assignee has to clear first.
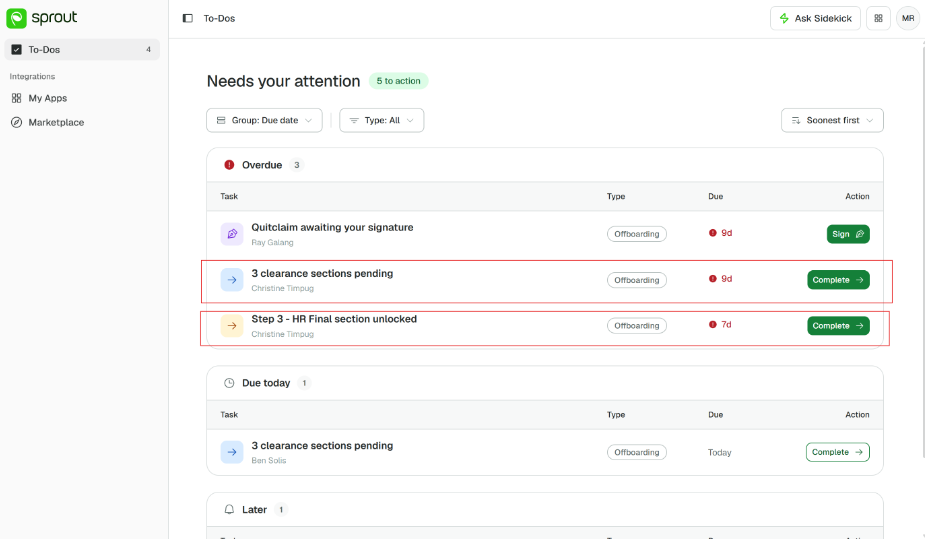
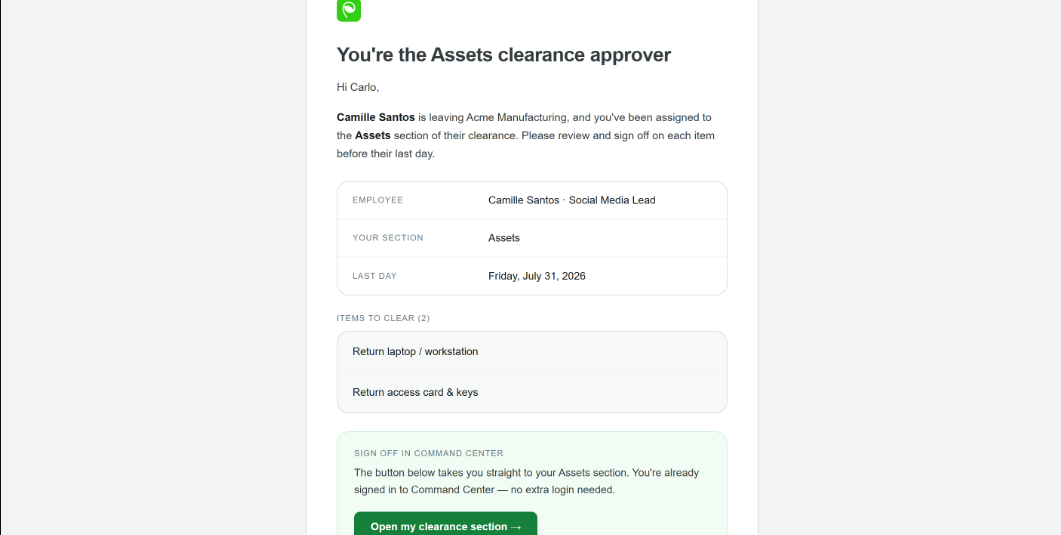
- Open your section. Use the link in the CC To-Do task or the notification email — it takes you directly to your assigned section, authenticated with your Sprout HR login. The page also shows the whole record, not just your part: a Clearance status summary at the top counts how many sections are cleared, and each section below it carries its own state and assignee name — so you can see where the record stands even though you can only act on your own sections. A running counter at the bottom of the page tracks how many items you have checked across your sections, alongside the Mark as cleared action.
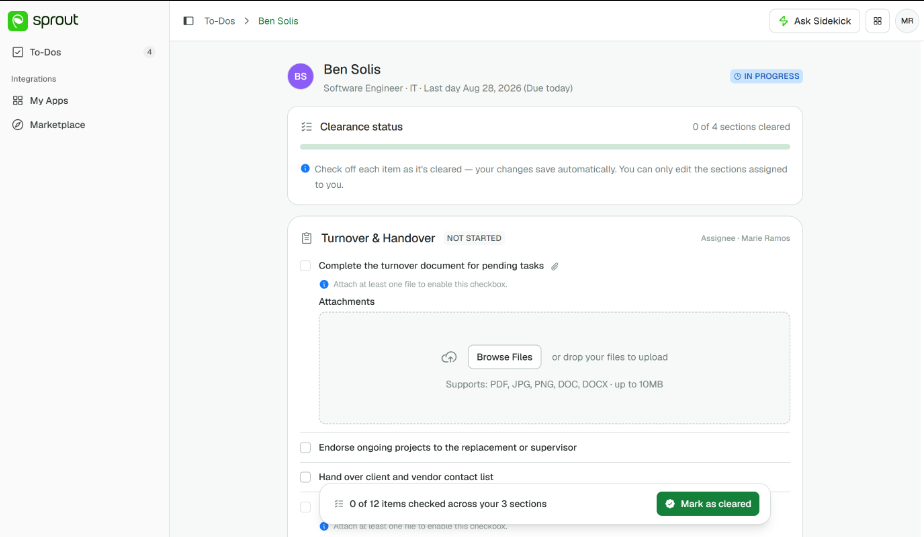
- Complete each item. Check off items as you finish them and upload any required documents — an item requiring an attachment stays unchecked until you upload it. Checking items is a staged change, and there is no Save — Mark as cleared is the only way to commit, and it signs off every section you own that is now fully checked, all at once, after a confirmation listing exactly which sections that covers. A section therefore has to be fully checked before you can clear it.
Your ticks do survive navigating away — switching tabs or moving around the product is safe — but they are lost if your session ends and you are logged out, which does happen. Work through a section in one sitting rather than leaving it part-completed for a long stretch.
- Once a section is signed off, it becomes read-only — even to you. If it turns out something needs to be reopened after the fact, only the HR Admin can do that; there's no self-service undo. Every completed item is stamped "Cleared by [your name] · [timestamp]," visible to you, the HR Admin, and the departing employee.
If something goes wrong:
- You never got notified at all: first confirm with your HR Admin that you're actually configured as the assignee on the record (they can see this inline on the Details tab). If you are, and you're in parallel mode, you should have gotten both a CC To-Do and an email on record creation — check spam for the email. In sequential mode, confirm every section ahead of yours has actually cleared first.
- You were notified but haven't acted yet: there's no follow-up reminder coming — that's expected, not a bug. Rely on your CC To-Do item as the persistent signal.
- You were assigned by mistake, or you've since left the company: there's no self-service way to reassign yourself — tell your HR Admin, who can complete the section for you. No Support ticket needed.
The HR Admin can also see and complete items in your section on your behalf — in that case, the completed item shows their name (not yours) as the actor.
Step-by-Step: Completing Your Offboarding (Departing Employee)
You don't use your Sprout HR login for this — it may already be deactivated by the time you complete these steps. Instead, you access everything through a personal portal link.
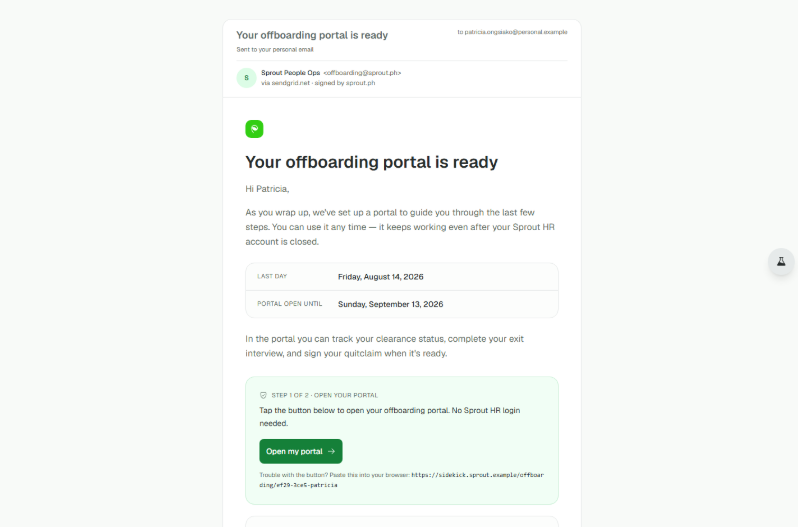
- Find your portal access. When your departure record is created, a magic link and a PIN are sent to your personal email — not your work email. You need both: the link takes you to your portal and the PIN is how you sign in. The PIN is not a spare key for a lost link, so keep the whole message. If the link stops working, ask your former employer's HR Admin to resend it — they can do this directly from the record, and a resend replaces the link and the PIN together, so use the newest email.
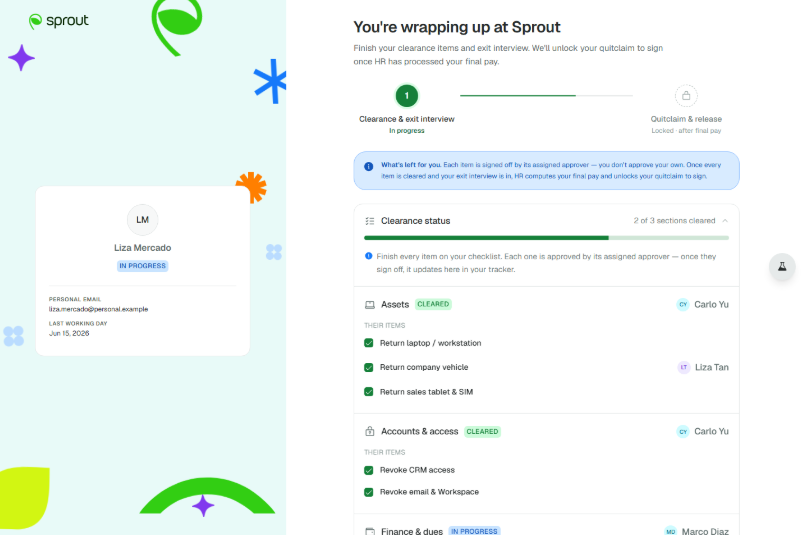
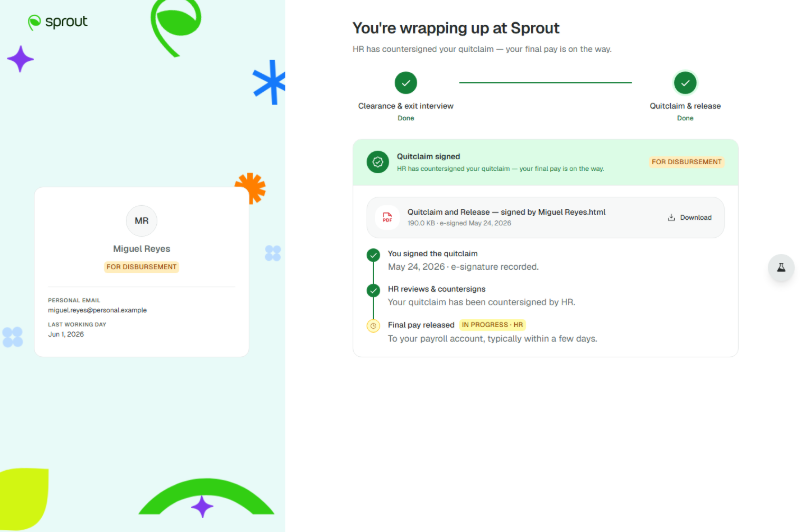
- Track your clearance progress. The portal's first tab shows the status of every clearance section and your quitclaim — you can check this at any time, and it stays accessible even after your Sprout HR account is fully deactivated. It stays open through the whole process, including after you sign: you keep access while HR reviews and confirms your quitclaim, while your final pay is being released, and after your record is marked Completed — completion does not cut off your link. If your link ever does stop working, ask your former HR Admin to resend it. Before your quitclaim is ready, this tab shows a locked preview with a note that no printing or scanning will be needed when the time comes.
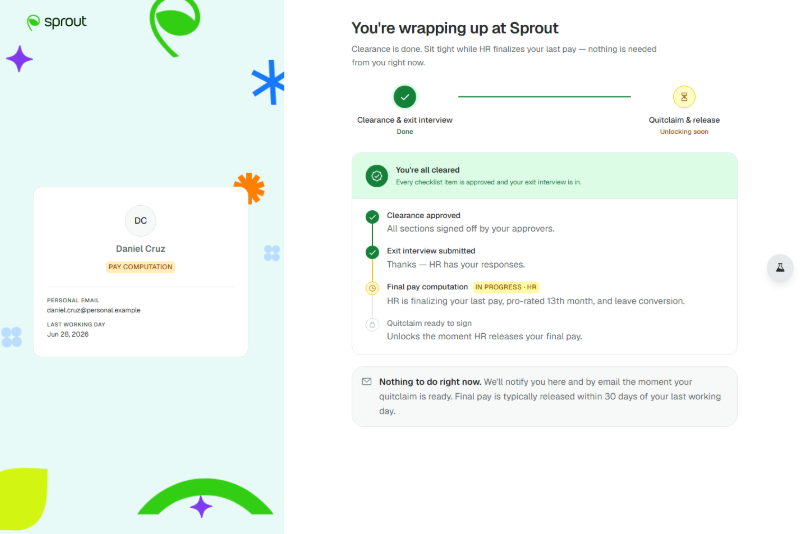
- Watch for the "you're all cleared" stage. Once every section is cleared (and your exit interview is submitted, if one is required), the portal shows a confirmation card and a step tracker while HR finalizes your pay — you'll be notified here and by email the moment your quitclaim document is actually ready to sign. This is a one-time notification tied to your specific record reaching that point, not a recurring reminder.
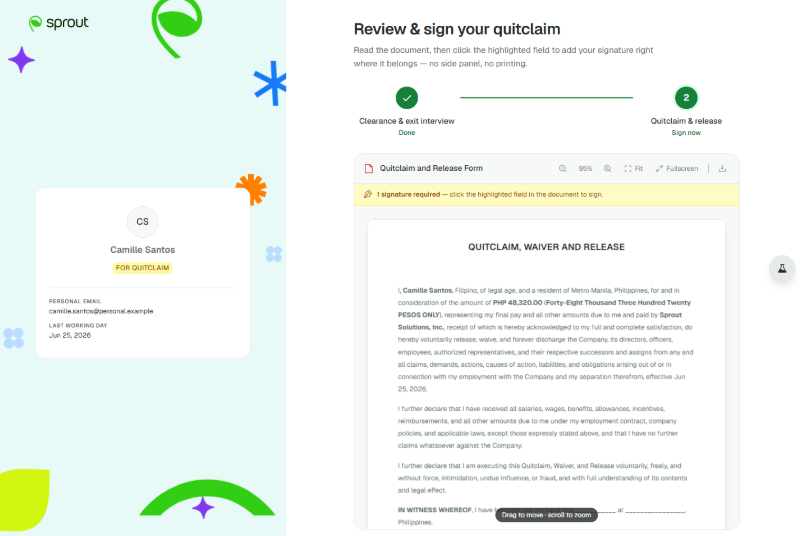
- Sign your quitclaim when it's ready. You'll get a document viewer you can pan and zoom, with your signature field highlighted (a fullscreen mode is available too) and three ways to sign — type it in a script font, draw it freehand, or upload an image of your signature. Review carefully before submitting: once you tap Submit to HR, the signature is final and can't be edited or redone. If a company signatory hasn't signed yet, you'll see their part of the document marked "Awaiting company signatory" rather than blank.
- If asked to re-sign: an HR Admin can request a re-sign for any reason they judge necessary — you'll see a banner with their stated reason, your previous signature is cleared (not kept), and you sign again from scratch through the same portal flow. This isn't an error; it's expected behavior.
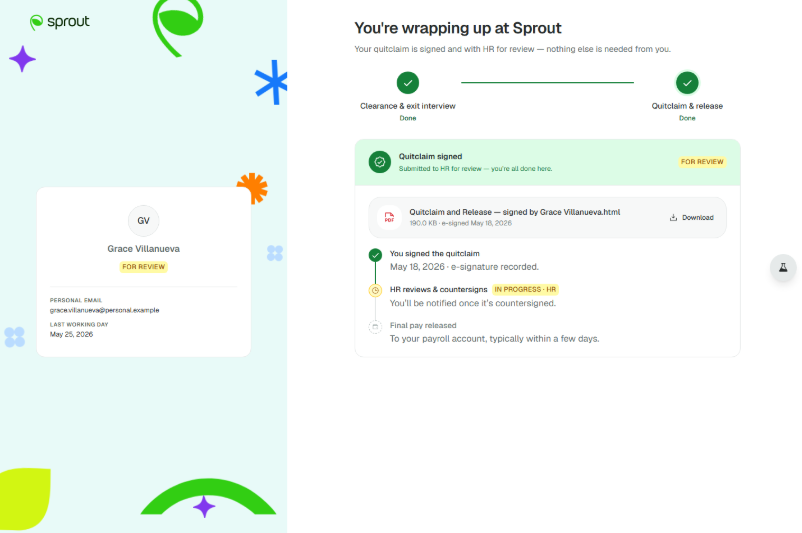
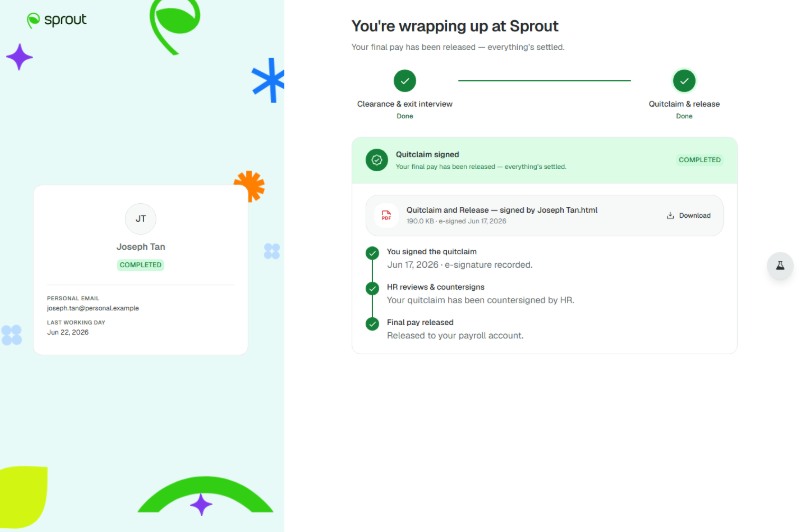
- Download your copy. As soon as your quitclaim is submitted you can download it from the portal. Once the HR Admin has reviewed and confirmed it (your record moves to For Disbursement), a "Download confirmed quitclaim" option appears. It is the same document — what changes is that HR has now verified it — so that is the copy to keep for your records. The quitclaim carries two signatures: the company's (signed by your HR Admin, or by a Company Signatory they delegated it to) and yours; HR confirming it is a review step, not a third signature. Both downloads stay available after your record is marked Completed, so there is no deadline to beat — though it is worth saving your own copy rather than relying on the portal indefinitely.
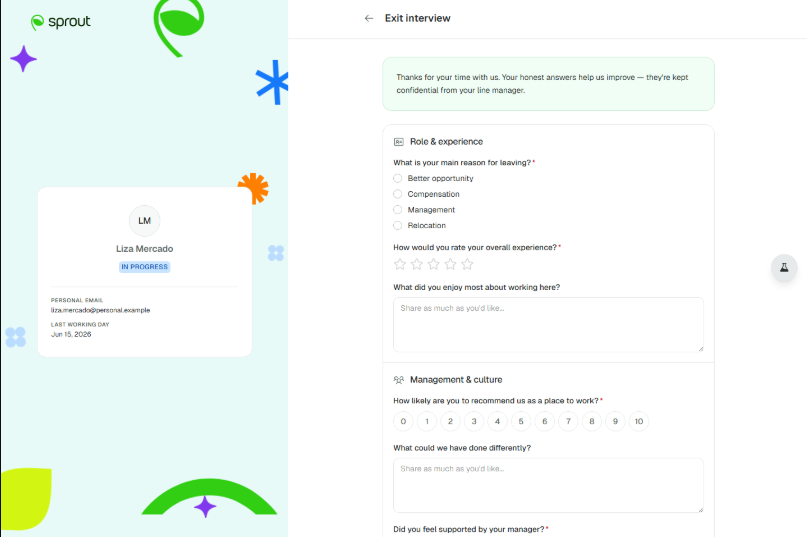
- Complete your exit interview. The exit interview sits in its own section near the bottom of your portal, below your clearance progress. Set aside time to finish it in one sitting — there is no draft and no Save button, so nothing is kept until you submit. Submitting is also final: you'll get a confirmation prompt ("Keep editing" backs out) before your answers lock in, and you cannot reopen them afterwards. Questions appear in a fixed, single sequence — there's no branching or skipping based on earlier answers, so expect to see every question regardless of how you answered previous ones. Required questions you skip are flagged only after you try to submit; optional ones you skip just show as blank in the record.
If something goes wrong:
- You can't log in to check your status: you're not meant to use your Sprout HR login for this at all — use the magic link or PIN from your personal email instead. If your former HR Admin resends it and it still doesn't work, ask them to escalate to Sprout Support with your record ID.
- A quitclaim you already signed shows as rejected: this means the HR Admin asked for a re-sign for a reason of their own judgment, not that something went wrong — see step 5 above.
- You got an email from someone other than your former employer asking you to sign something: if it's about your quitclaim, that's likely the Company Signatory the HR Admin delegated — this is expected, not a phishing attempt, though you can always confirm with your former HR Admin if unsure.
There are no reminder emails for your clearance status or your exit interview (the one-time notification in step 3 is tied to a specific status change, not a recurring reminder) — the portal is your persistent access point, so check back on your own schedule.
Record Status Reference
Every departure record moves through the following statuses, in order (one is conditional and may be skipped):
| Status | What moves it here | What moves it forward | Who can act while it's here |
|---|---|---|---|
| In Progress | Record created via Start offboarding | Every section signed off | HR Admin (full edit); Section Assignees (own section only); Employee (portal: read-only progress, exit interview if applicable) |
| Awaiting Exit Interview (conditional — skipped entirely if the record has no exit interview form) | All clearance sections signed off, but the exit interview hasn't been submitted yet and is required | Employee submits the exit interview | Employee (submits exit interview); everyone else: view-only |
| For Final Pay Computation | Clearance complete (and exit interview submitted, if required) | HR Admin opens Move to Quitclaim Release and confirms | HR Admin only; Employee sees a "you're all cleared" waiting screen |
| For Quitclaim Release | HR Admin releases the quitclaim (directly, or after Company Signatory/HR Admin signs, depending on template settings) | Employee submits their e-signature | Employee (signs); HR Admin (view/monitor) |
| For Review | Employee's signature submitted | HR Admin confirms (→ For Disbursement) or requests a re-sign (→ back to For Quitclaim Release) | HR Admin acts; Employee keeps read-only portal access (signed card + two-party download) |
| For Disbursement | HR Admin confirms the quitclaim | HR Admin uploads proof of disbursement ("Mark as Disbursed") | HR Admin acts; Employee keeps read-only portal access — the portal shows "HR has countersigned your quitclaim — your final pay is on the way" and the Download confirmed quitclaim button |
| Completed | Proof of disbursement confirmed | — (terminal) | View-only for the HR Admin. The employee keeps read-only portal access — the portal shows the settled state (all three timeline steps done) and the confirmed-quitclaim download stays available; a completion confirmation email goes to the employee with proof of disbursement attached |
Employee portal access window. The departing employee's portal stays open through every status, including after the record is marked Completed — signing the quitclaim does not close it, and neither does the HR Admin recording final-pay disbursement. At Completed the portal shows the settled state (all three timeline steps done) and the confirmed-quitclaim download remains available. Nothing in the process revokes portal access on a status change; a link can still stop working for the ordinary reasons (the HR Admin resends it, which replaces the old link and PIN, or the link reaches its own expiry), in which case the HR Admin can resend.
Key Configuration Options (HR Admin)
| Option | What It Controls |
|---|---|
| Lifecycle category on a template | Must be set (Hire/Onboarding/Movements/Compensation/Offboarding) before a template can be published |
| Per-item required/optional toggle | Controls whether a clearance item blocks progress; template-level only, no record-level override |
| Inter-section sequential clearance | When enabled, locks a section for assignees until the preceding section (owned by a different assignee) is fully cleared; you retain full access regardless |
| Exit interview mode | Controls whether the record gates on exit-interview submission before advancing to Final Pay Computation |
| Company Signatory (per quitclaim template) | Controls whether a delegated signatory signs before the employee, and whether the HR Admin can sign inline ("Sign now") or must assign it out |
Known Limitations and Workarounds
- No automated reminder emails, for anyone. HR Admins, Section Assignees, and Departing Employees all rely on their initial notification plus the Offboarding list's status indicators (HR Admin) or CC To-Do items (Section Assignee) instead of a follow-up nudge as a deadline approaches. The one-time "quitclaim is ready" notification (Record Status Reference above) is a status-change alert, not a recurring reminder — don't conflate the two if a client asks.
- No editing of checklist structure, at any point. Sections and items come from the template selected at record creation and cannot be changed for an individual record — before or after creation. HR Admins: get your template right in Workflow → Templates first; only the section and item approvers (at the section or item level) can be set per record, and only before it is created.
- No automatic final-pay pull from Payroll. The HR Admin enters the figure manually when moving a record to For Quitclaim Release; the two-party quitclaim signature is the confirmation control.
- A clearance section may show a count rather than the assignee's name and avatar. This is a display issue and can appear on an account of any size. Your clearance data, the assignments themselves and every sign-off are unaffected — confirm who the assignee is from the record, or ask them directly. A fix is already scheduled, so there is nothing Support can add in the meantime.
Your Customer Success Manager can share the full list of current limitations.
Where to Get Help
- HR Admin: Contact your Customer Success Manager for setup questions, or Sprout Support for anything that looks like a defect rather than expected behavior described above.
- Section Assignee: Contact your company's HR Admin first — they can resend notifications, check your section assignment, or escalate to Sprout Support on your behalf.
- Departing Employee: Contact your former employer's HR Admin — they can resend your portal link/PIN or escalate to Sprout Support. You won't have access to Sprout Support directly.
Want real-time responses? Explore Sidekick, your 24/7 guide for product inquiries!